Guide: RPG Developer Bakin & VRM Models - Animations, Rigging and more!
A downloadable tutorial
A newer version of the guide can be found on Steam Community, in both English and Japanese.
English: https://steamcommunity.com/sharedfiles/filedetails/?id=3512058154
Japanese: https://steamcommunity.com/sharedfiles/filedetails/?id=3512269914
Have you been struggling with using VRM models in RPG Developer Bakin, or simply want to get started making your very own waifu game in full 3D with little coding experience? Items aren't being held by your character, or you couldn't get your custom animation working? This quick guide will cover as many aspects of getting a VRM character to not only import with additional features, such as eye tracking, and head tilting, but also get some fundamentals working properly, since there is a lack of documentation going around.
ℹ️ We make use of Blender and two addons throughout this tutorial, but don’t let that scare you! I’ve optimized the entire procedure so that you have to use it as little as possible!
Software you'll need:
- RPG Developer Bakin: The game engine we're using for these tutorials. It might look like it only has HD-2D to offer, but you can make full 3D games in it easily.
- VRoid Studio: Software to create 3D anime characters. Third party assets to improve your models can be found and bought over at Booth (triple-check terms and conditions of every single item for commercial use/software embedding before buying!)
- Blender: The 3D modelling app that our plugins will use.
I - Exporting your VRoid Model from VRoid Studio
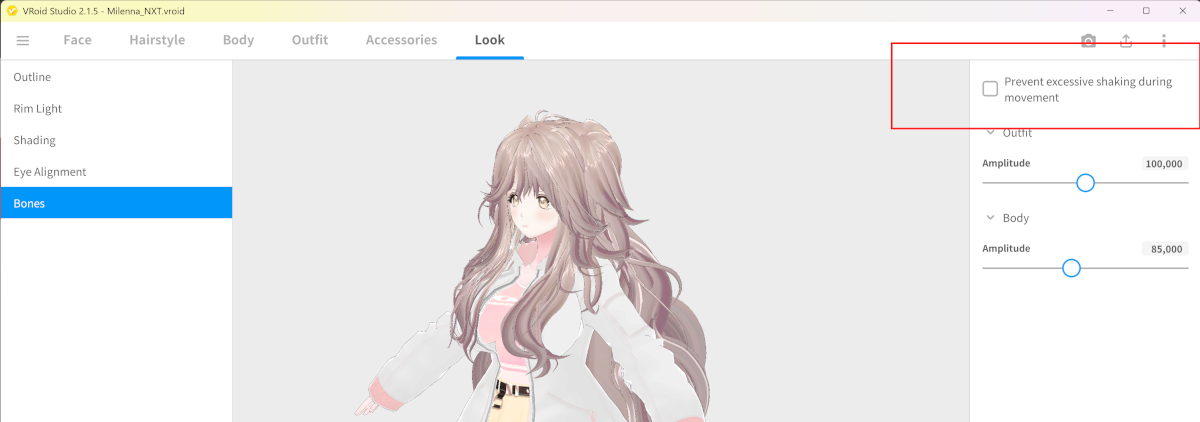
Before even exporting the model, it's important to turn off the "Prevent excessive shaking during movement" option if you want your character's hair to move freely. If it's turned on, the hair's movement is locked in the axis of your player movement in an unnatural way. This will change how things like the bust will bounce as well, so adjust the Outfit and Body values accordingly after testing.
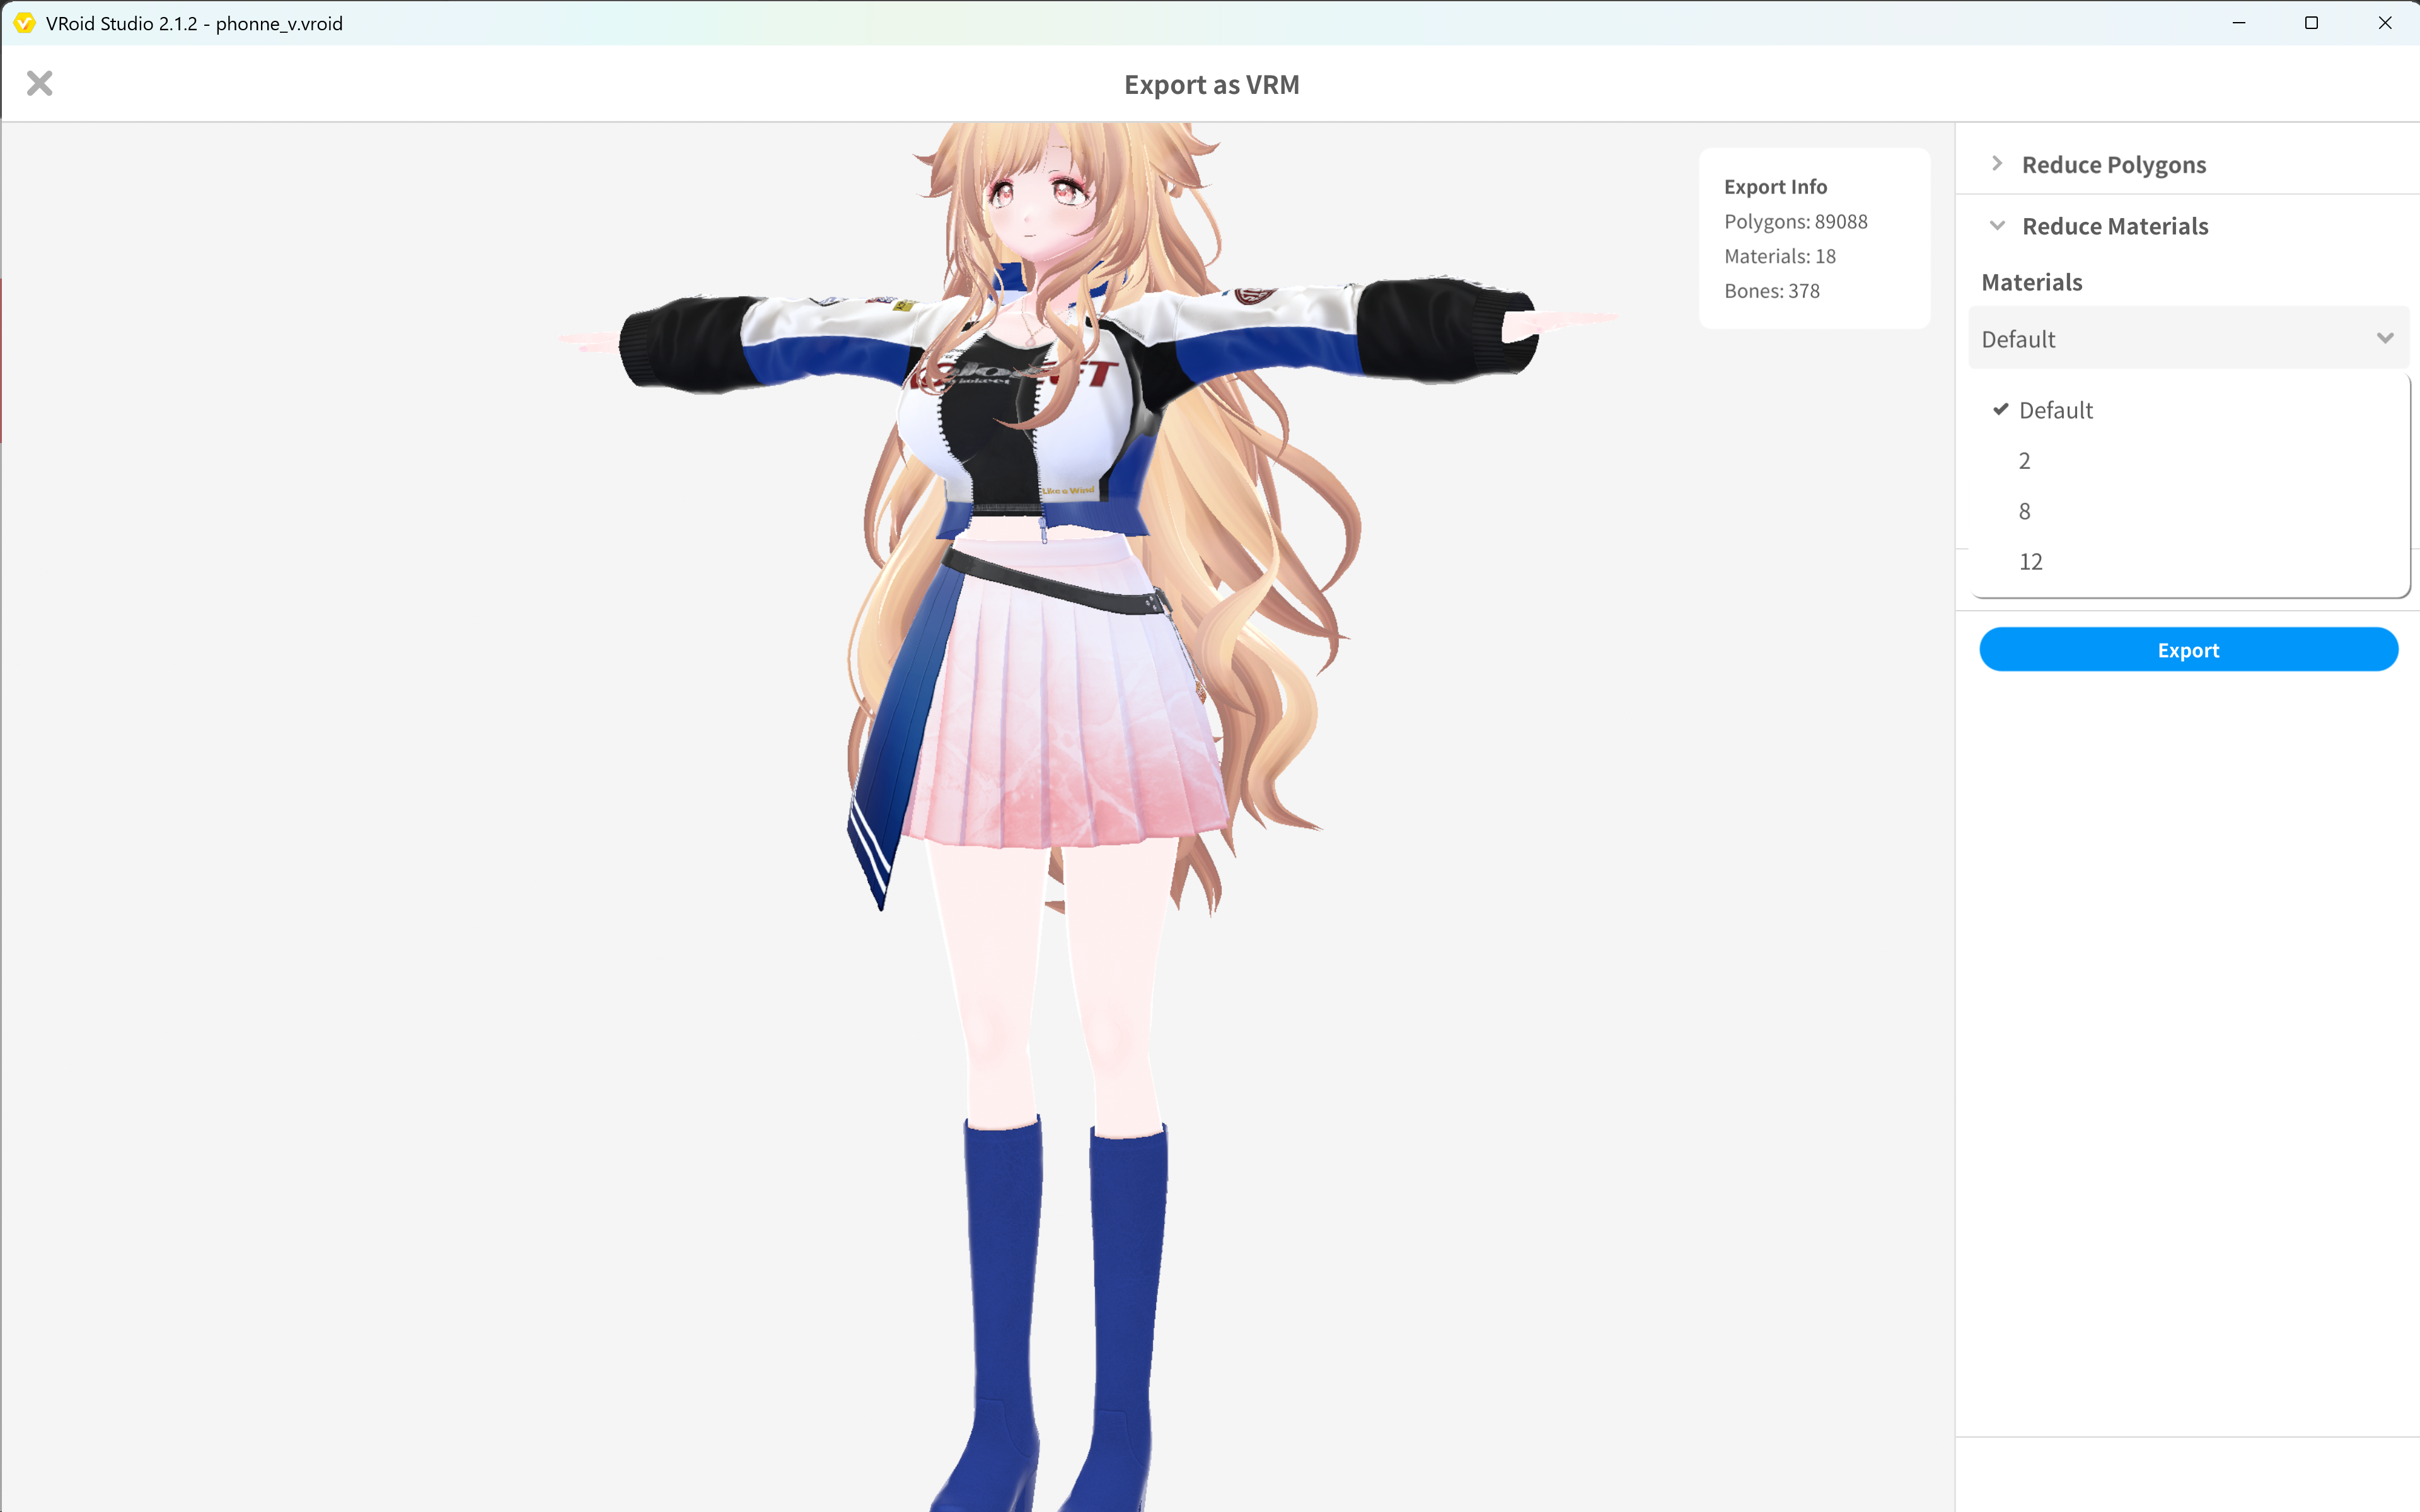
All models from VRoid Studio should work. However, to avoid some strange bugs and surprises in Bakin, you should reduce the material count to 8, and I strongly recommend the usage of VRM 1.0 instead of 0.0. On the export as VRM screen, open Reduce Materials, and set Materials down to 8. When pressing Export, change the model from 0.0 to 1.0.
In theory, you could just pass the VRM that VRoid Studio has given you, and it'll work, and come with some basic animations. But if you try adding your own animations, anything beyond simple mixamo animations that have not been altered after download (the wiki has a basic tutorial on how to do that here), you're going to encounter several bugs.
II - Creating a modified VRM for Bakin in Blender
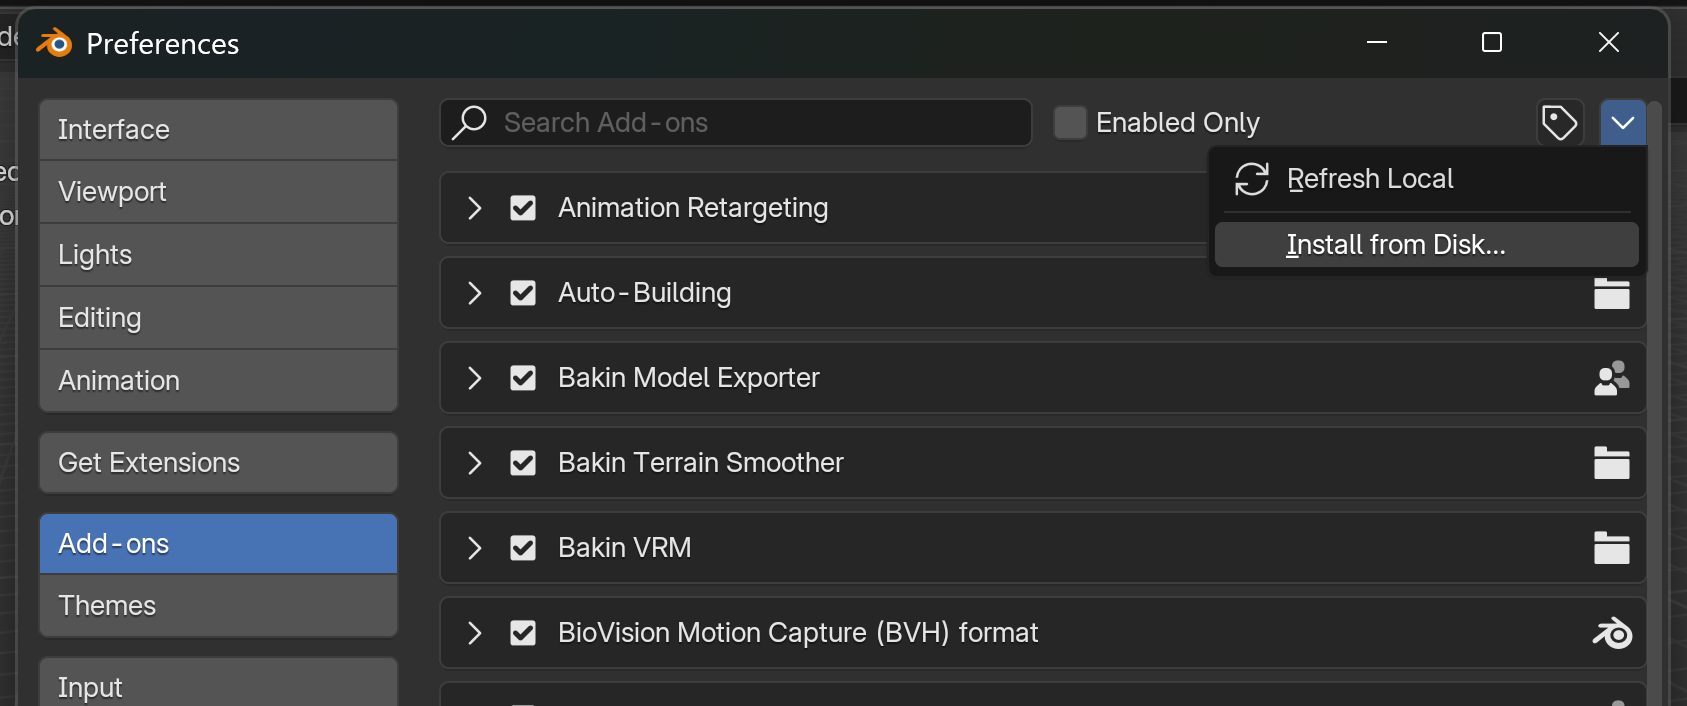
⚠️ You'll need to first install these blender addons:
- VRM Addon for Blender: Essential addon to be able to import and export VRM models and VRMA animations. Install this before the rest.
- VRoid for Bakin: Suite of functions to automate 90% of the enhancements needed to have VRMs working nicely in Bakin and getting animations working hassle-free, sourced from either third-party websites, your own animation, or VRMA animations.
- Blender Animation Retargeting: Used to transfer animations between the VRM and a dummy model required to get it working in Bakin. Also useful for bringing in animations that don't originate from Mixamo or from VRMA files.
- VRM Spacing Animation Baking: (Optional, but especially useful for animating) Utility to adjust spacing on arms/legs/head/etc on the animations baked on VRM characters, as well as baking dynamic physics. Great for fine tuning the posture of Mixamo animations.
To install the addons, download the zip files (don't extract), open Blender, and in Edit -> Preferences -> Add-ons, click on the top right arrow and install from disk each zip file.
In this section, we're going to create an altered VRM model that'll better suit Bakin, and will used to animate the model in later chapters.
From startup, in a new scene, get a clean slate by pressing the A key to select all the objects in the scene, then press the DELETE key to delete all the objects in the scene.
You can open the add-ons side panel by pressing the N key. Scroll down the tabs with mouse wheel over the tabs until you find the VRoid for Bakin tab, and open it.
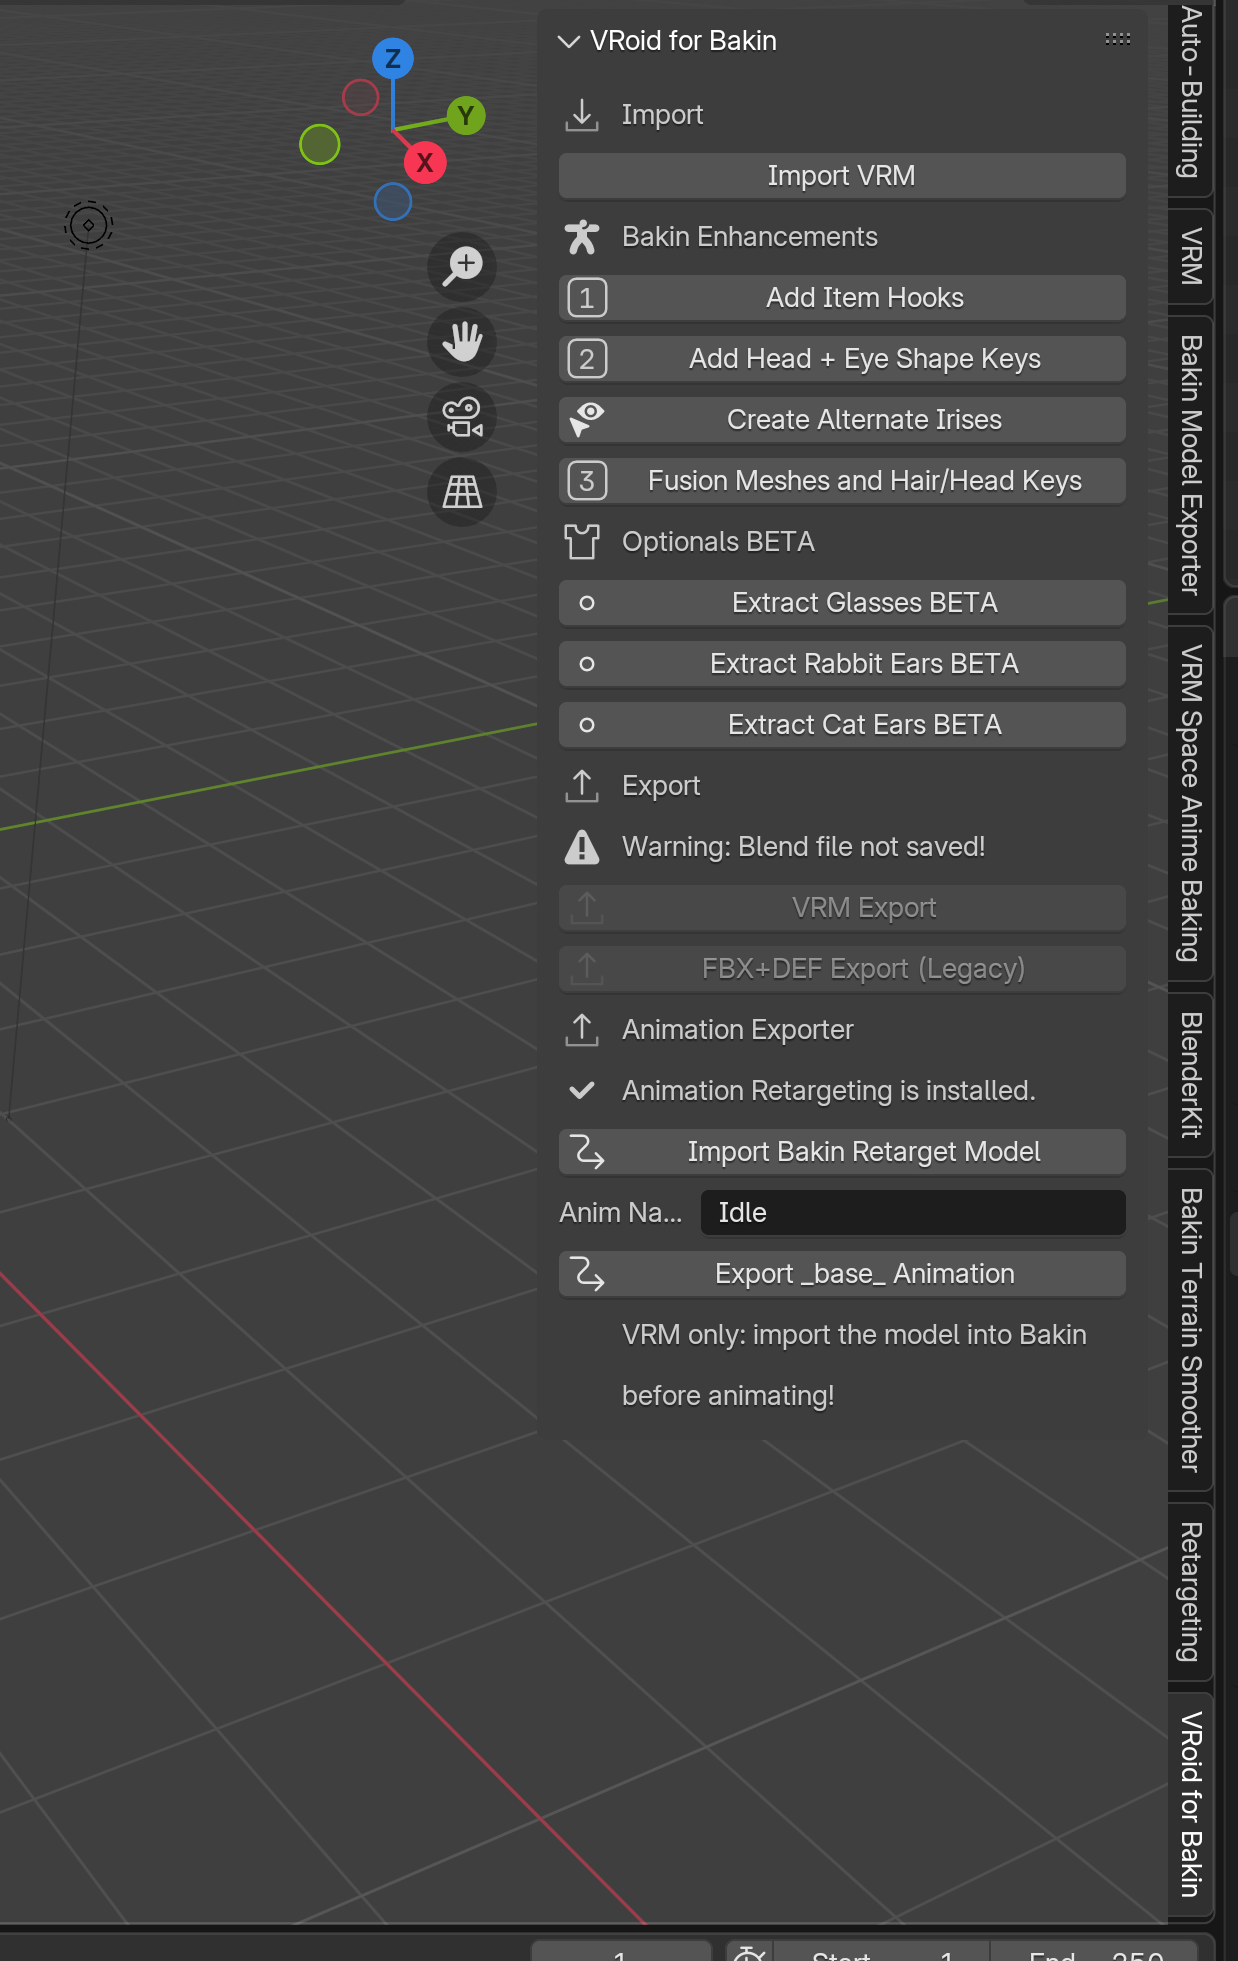
The usage of this add-on is as follows, in order:
- Press "Import VRM" and navigate to the VRM model you just exported from VRoid Studio.
- Press the buttons for the features you want to add:
- [Add Item Hooks]: This adds two bones for Bakin to immediately recognize as item hook bones, letting the model hold objects in their hands through events and equipment.
- [Add Eye Shape Keys]: This adds "facial expressions" that Bakin will recognize for the eyes, simulating the eyes being able to "look" at things. Adds a bit of weight to the final file size when exporting.
- [Add Head + Body Shape Keys]: This adds "facial expressions" that Bakin will recognize for the head, simulating the head's ability to turn up/down/left/right. This adds significant weight to final export (100MB final exports aren't uncommon). If you're using this, you must also press [Fusion Meshes and Hair/Head Keys], otherwise the model will have a big void in their neck while turning.
- [Create Alternate Irises]: This adds multiple irises that can be swapped around using Bakin's facial expressions in game, similar to a MikuMikuDance model. You'll need to select a texture for it in a special format, so download the template from here. Then, press "Create Alternate Irises" and select the template (you can change the texture later inside of Bakin).
Once you've selected your options, you can then proceed to the next section.
⚠️ About saving the Blend file
⚠️ Due to the way my addon works, the current scene needs to be saved in a blend file for it to permit exporting, but more importantly, the hierarchy of files you create will be very important for the later segments of the tutorial to work properly!
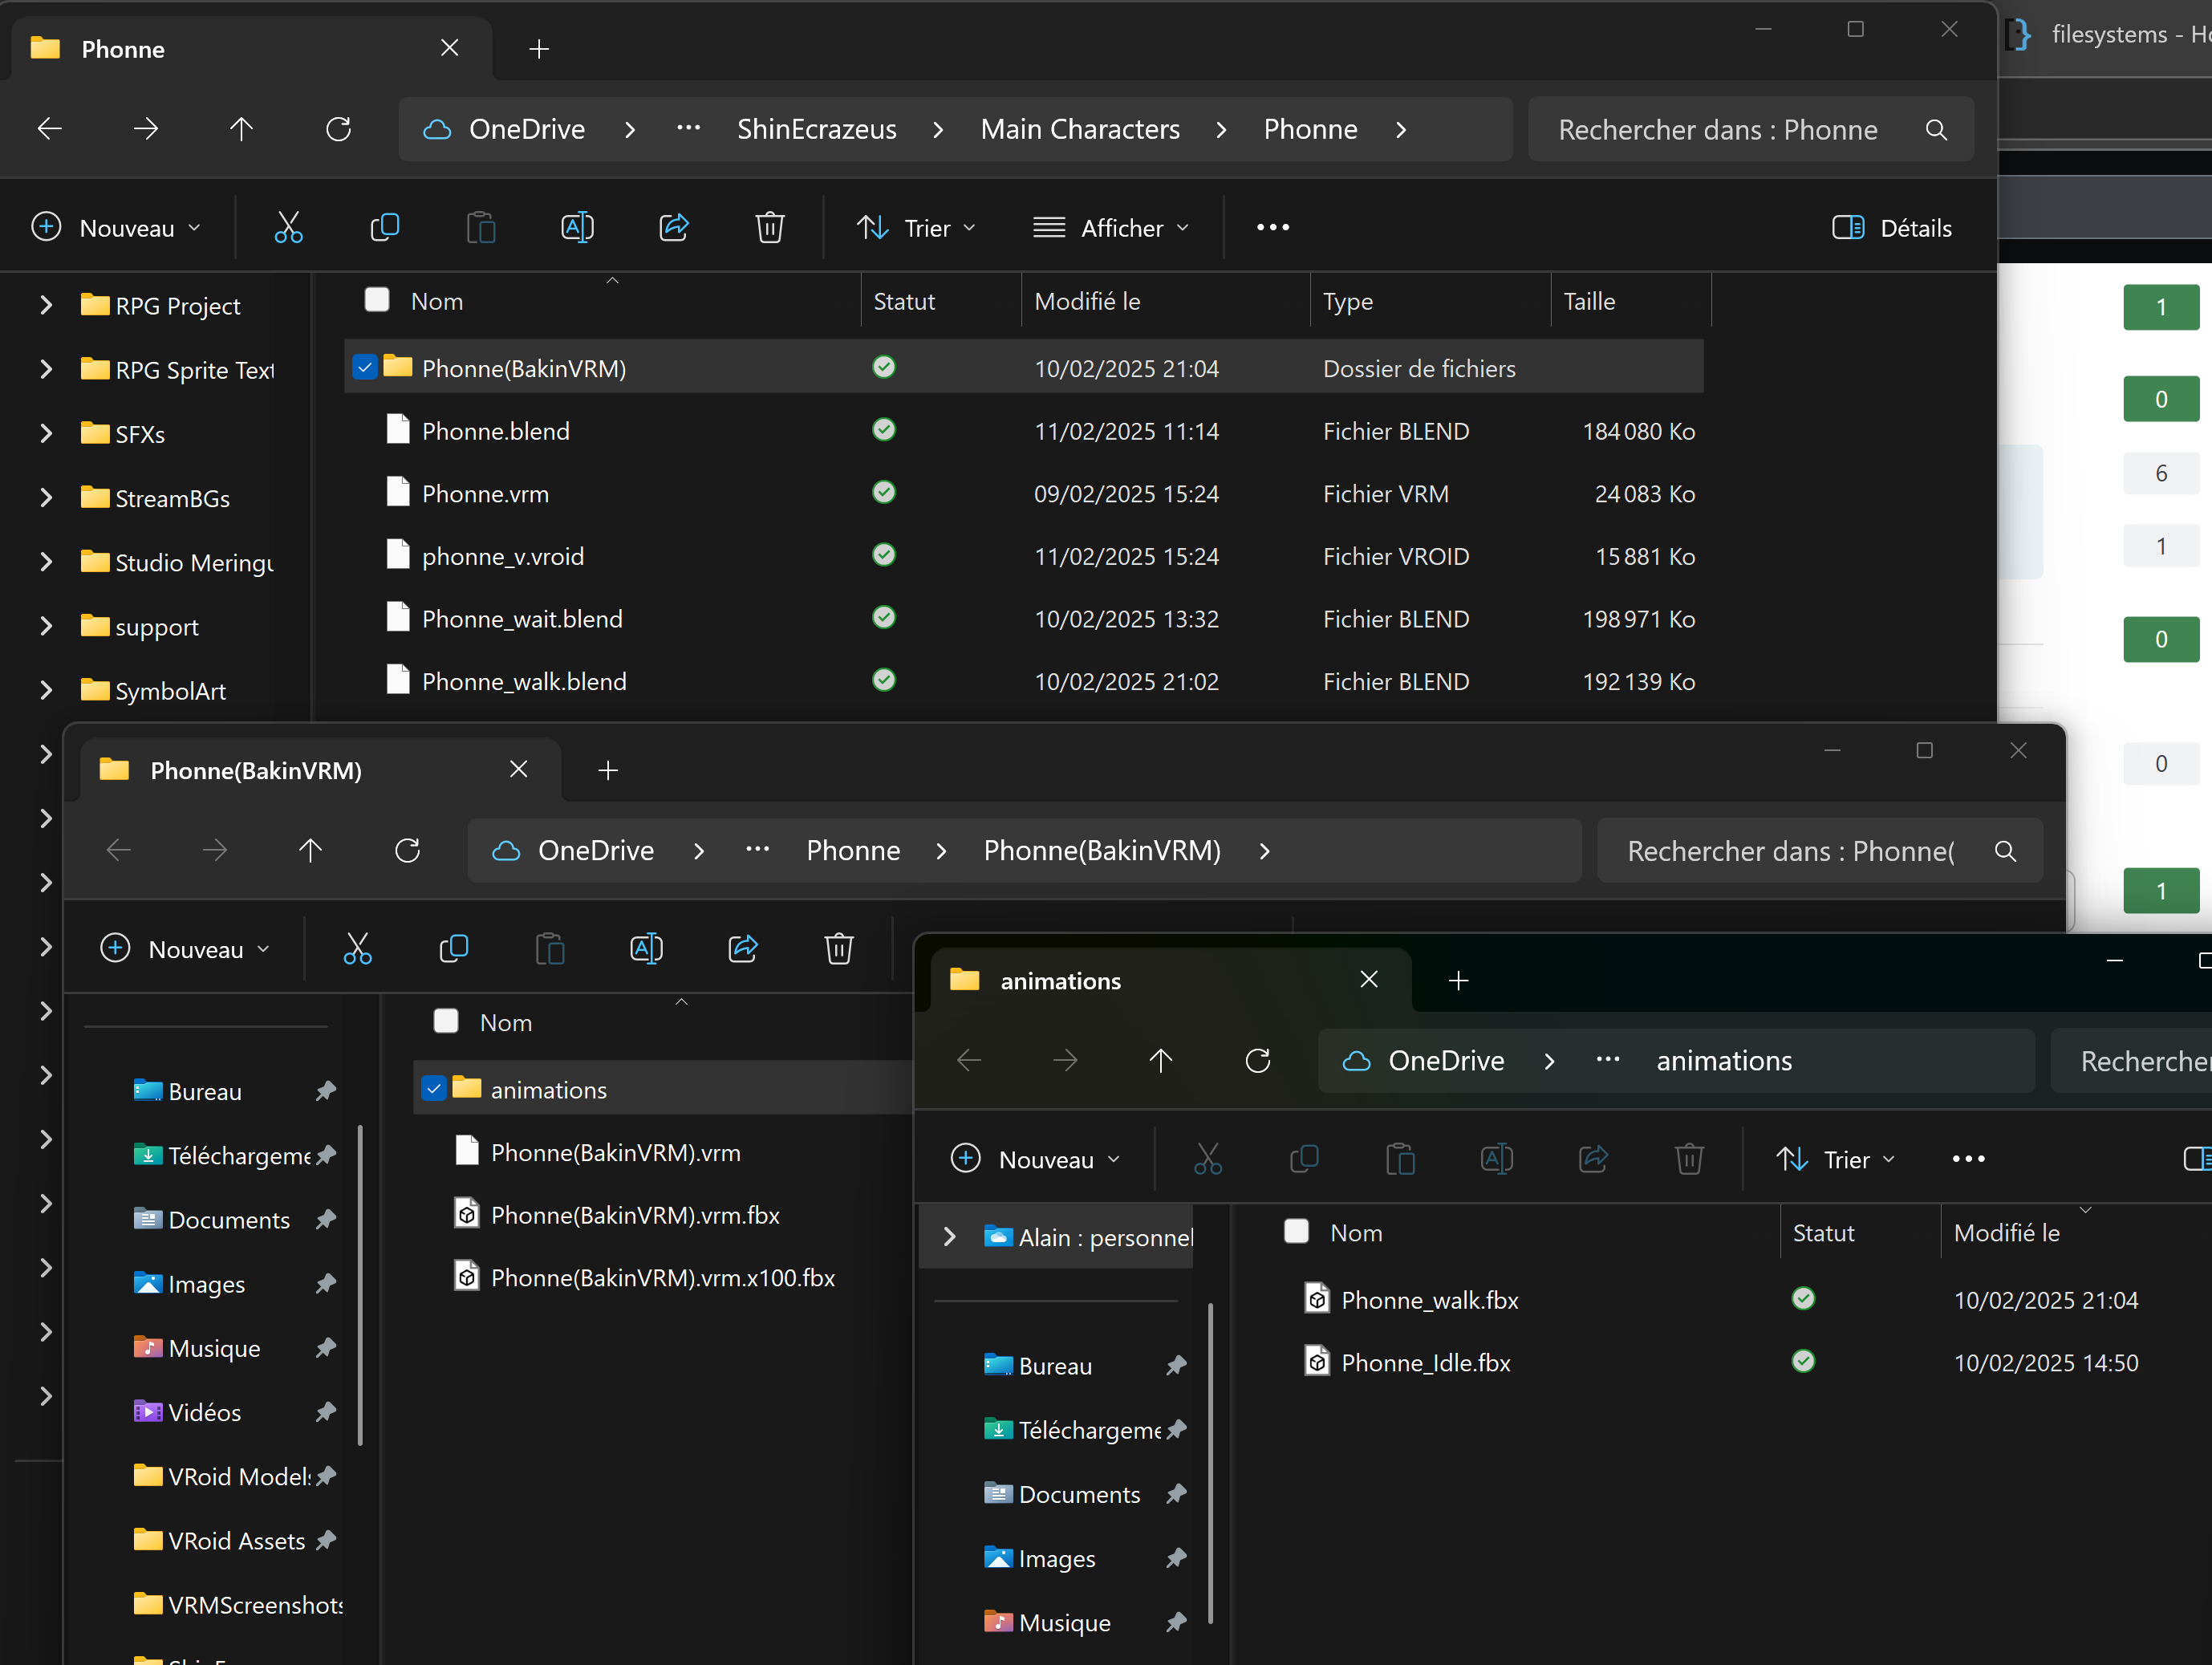
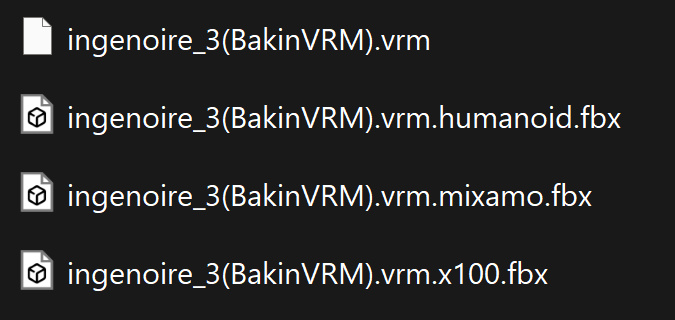
These are the contents of a folder called Phonne, based off the character's name. The original VRM from VRoid Studio, the Main Blend, and 2 animation blend are all in the same directory. Any object in Phonne(BakinVRM) gets automatically generated by the various tools used throughout the tutorial.
First, before saving the blender project as a blend file, create a folder on your computer that will exclusively house files related to a single character you're exporting. Name it as your character's name. Then, save the blend file here. From here on out in the tutorial, we'll be referring to this VRM model blend file as the Main Blend, and it's important to not alter it, as we'll use it as a jumping-off point to create separate animation files from.
Also, from here on out, everything the addons generate will be within folders inside the folder the Main Blend is in, including the Bakin ready models and animations. Speaking of animations, both the Main Blend and animation blends must be placed in the same folder, but we'll cover that in the animation section.
(NEW) Extra! Adding better colliders!
I made a new add-on to add some better hair colliders, so that it can better react to the arms, breasts, and some countermeasure to prevent long hair from piercing the body.
<iframe height="167" width="552" src="https://itch.io/embed/3352947" frameborder="0"><a href="<a href="https://meringue-rouge.itch.io/vrm-physics-enhancer">VRM" class="redactor-linkify-object">https://meringue-rouge.itch.io/vrm-physics-enhancer">VRM</a> Physics Enhancer by Meringue Rouge</a></iframe>
If you've already exported the new VRM (see below), don't worry! Adding the colliders and re-exporting, then going into Bakin, and under the Resources section, go to Models, find your model, and press the 🔄 refresh button, and accept the changes. The physics should then adjust.
Exporting the new VRM model
With your main blend saved, you can now export the model for use in Bakin. There are two options:
- VRM Export (Recommended): This exports a modded VRM model, to utilize the new direct import VRM feature in Bakin, and it is what this tutorial will focus on, including fixing animation bugs and more. The only downsides are that through Blender, the new VRM's filesize will jump quite a bit, and it takes a few more steps to apply animations with the VRoid for Bakin addon.
- FBX + DEF Export (Old Method): Prior to December 2024, this was the best way to import VRM models into Bakin, but unlike the official VRM support, the visuals are significantly less accurate, and it won't have any future support compared to its VRM counterpart (which gets official SmileBoom updates) and also lacks features in Bakin like the dynamic physics. The only advantage is that applying custom animations doesn't require using the animation tools at the bottom of the VRoid for Bakin extension, since Bakin doesn't alter the armature structure. The tutorial doesn't focus on this method.
Upon clicking, it will immediately export the model in a new folder where the Main Blend is located, the model's name with the (BakinVRM) suffix. This is the VRM you'll be importing into Bakin.
Does your model wear eyewear/glasses? If so, consider pressing the Eyewear Only: Split/Export/Delete button. This will export and delete the glasses from the scene, and it can be added back in Bakin through Subgraphics. If you did this, export the model without the glasses again as a VRM.
Quit Blender and open up RPG Developer Bakin: yes, you first need to import the model into Bakin, since the import will generate important files for animation.
III - Importing the new VRM into Bakin
We're going to assume you have some basic knowledge of how to use RPG Developer Bakin.
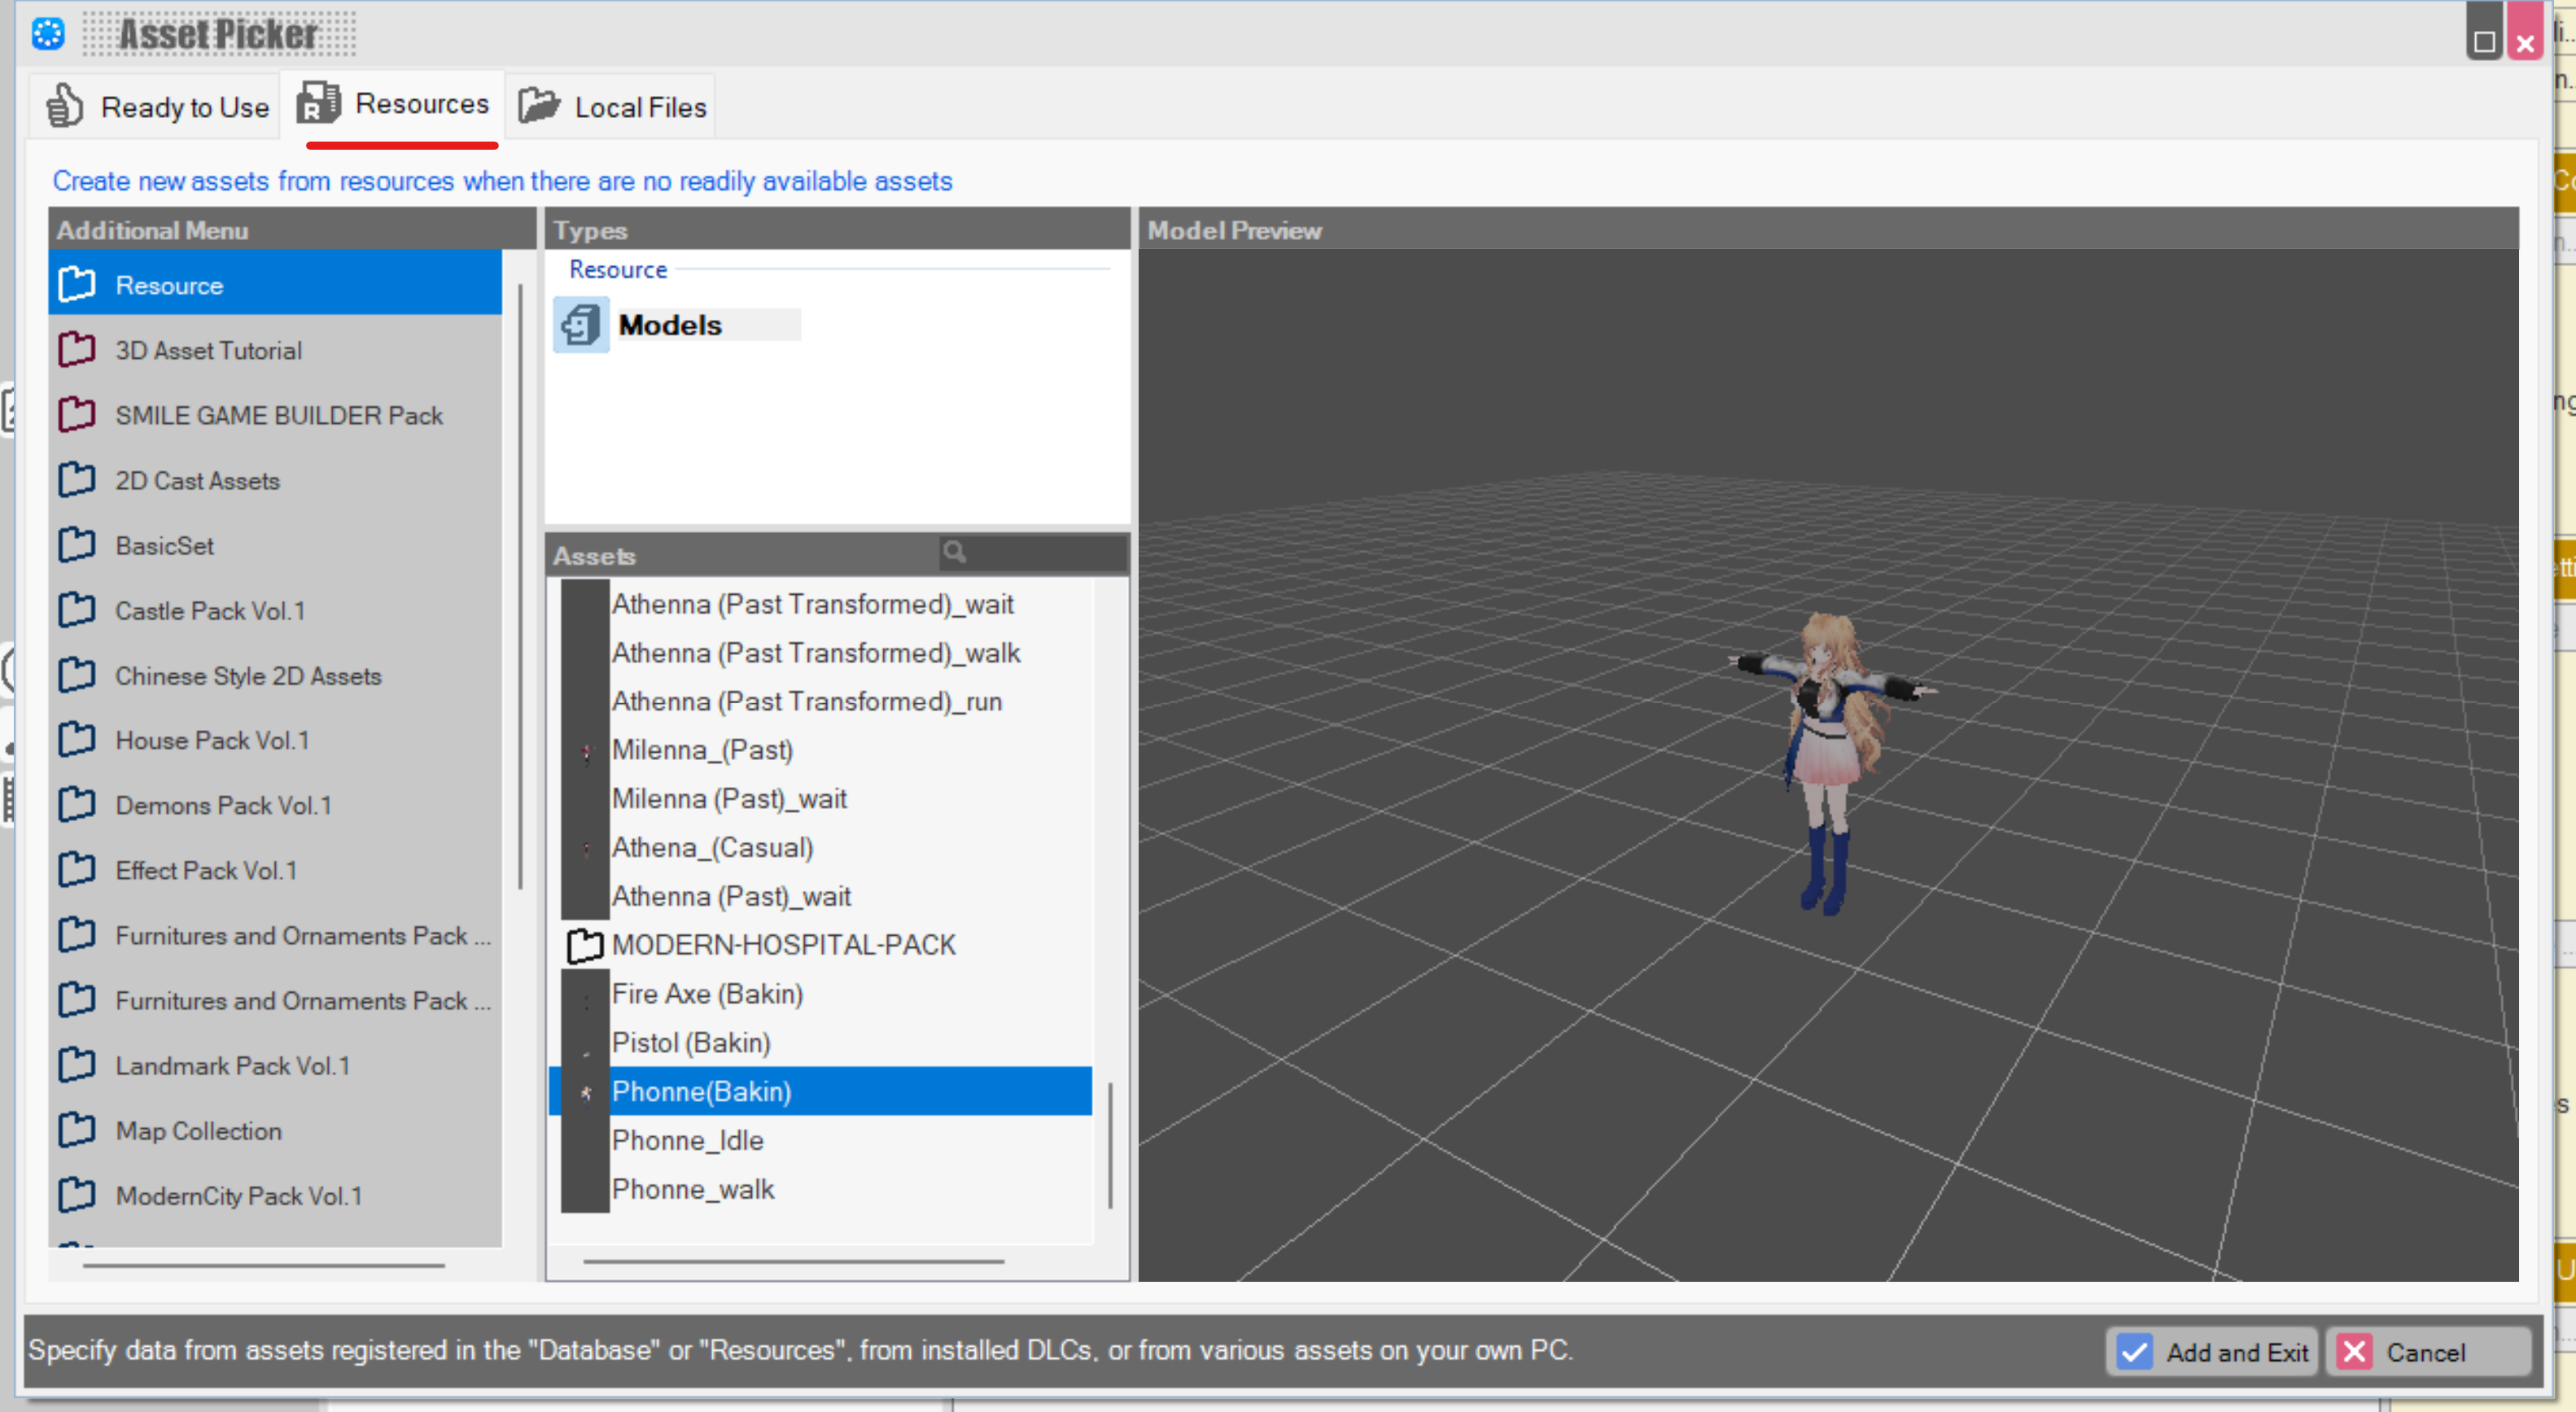
Open up your game project, and go into the Resources section, 3D Stamps. Create a new folder to house your VRoid models (organize it how you want) and import your new VRM model with the (BakinVRM) suffix, not the original.
If a window prompt appears, always select "Create new materials" if it asks. Your model works, but there are a few things we should do before going back to Blender and creating our own animations.
Blend Shapes
Blend shapes are used to create facial expressions on the fly, through events and dialogue. Configuring these by hand is a time waster, so I've done the heavy lifting and created a preset selection over on the Steam Workshop.
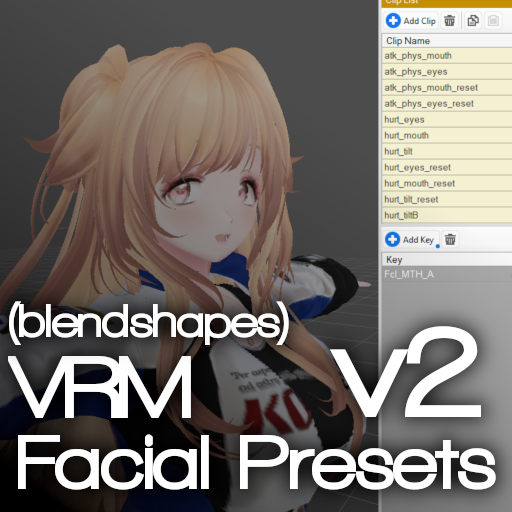
It even has the blendshapes for the modded VRM features like head tilt, eye position and alternative irises.
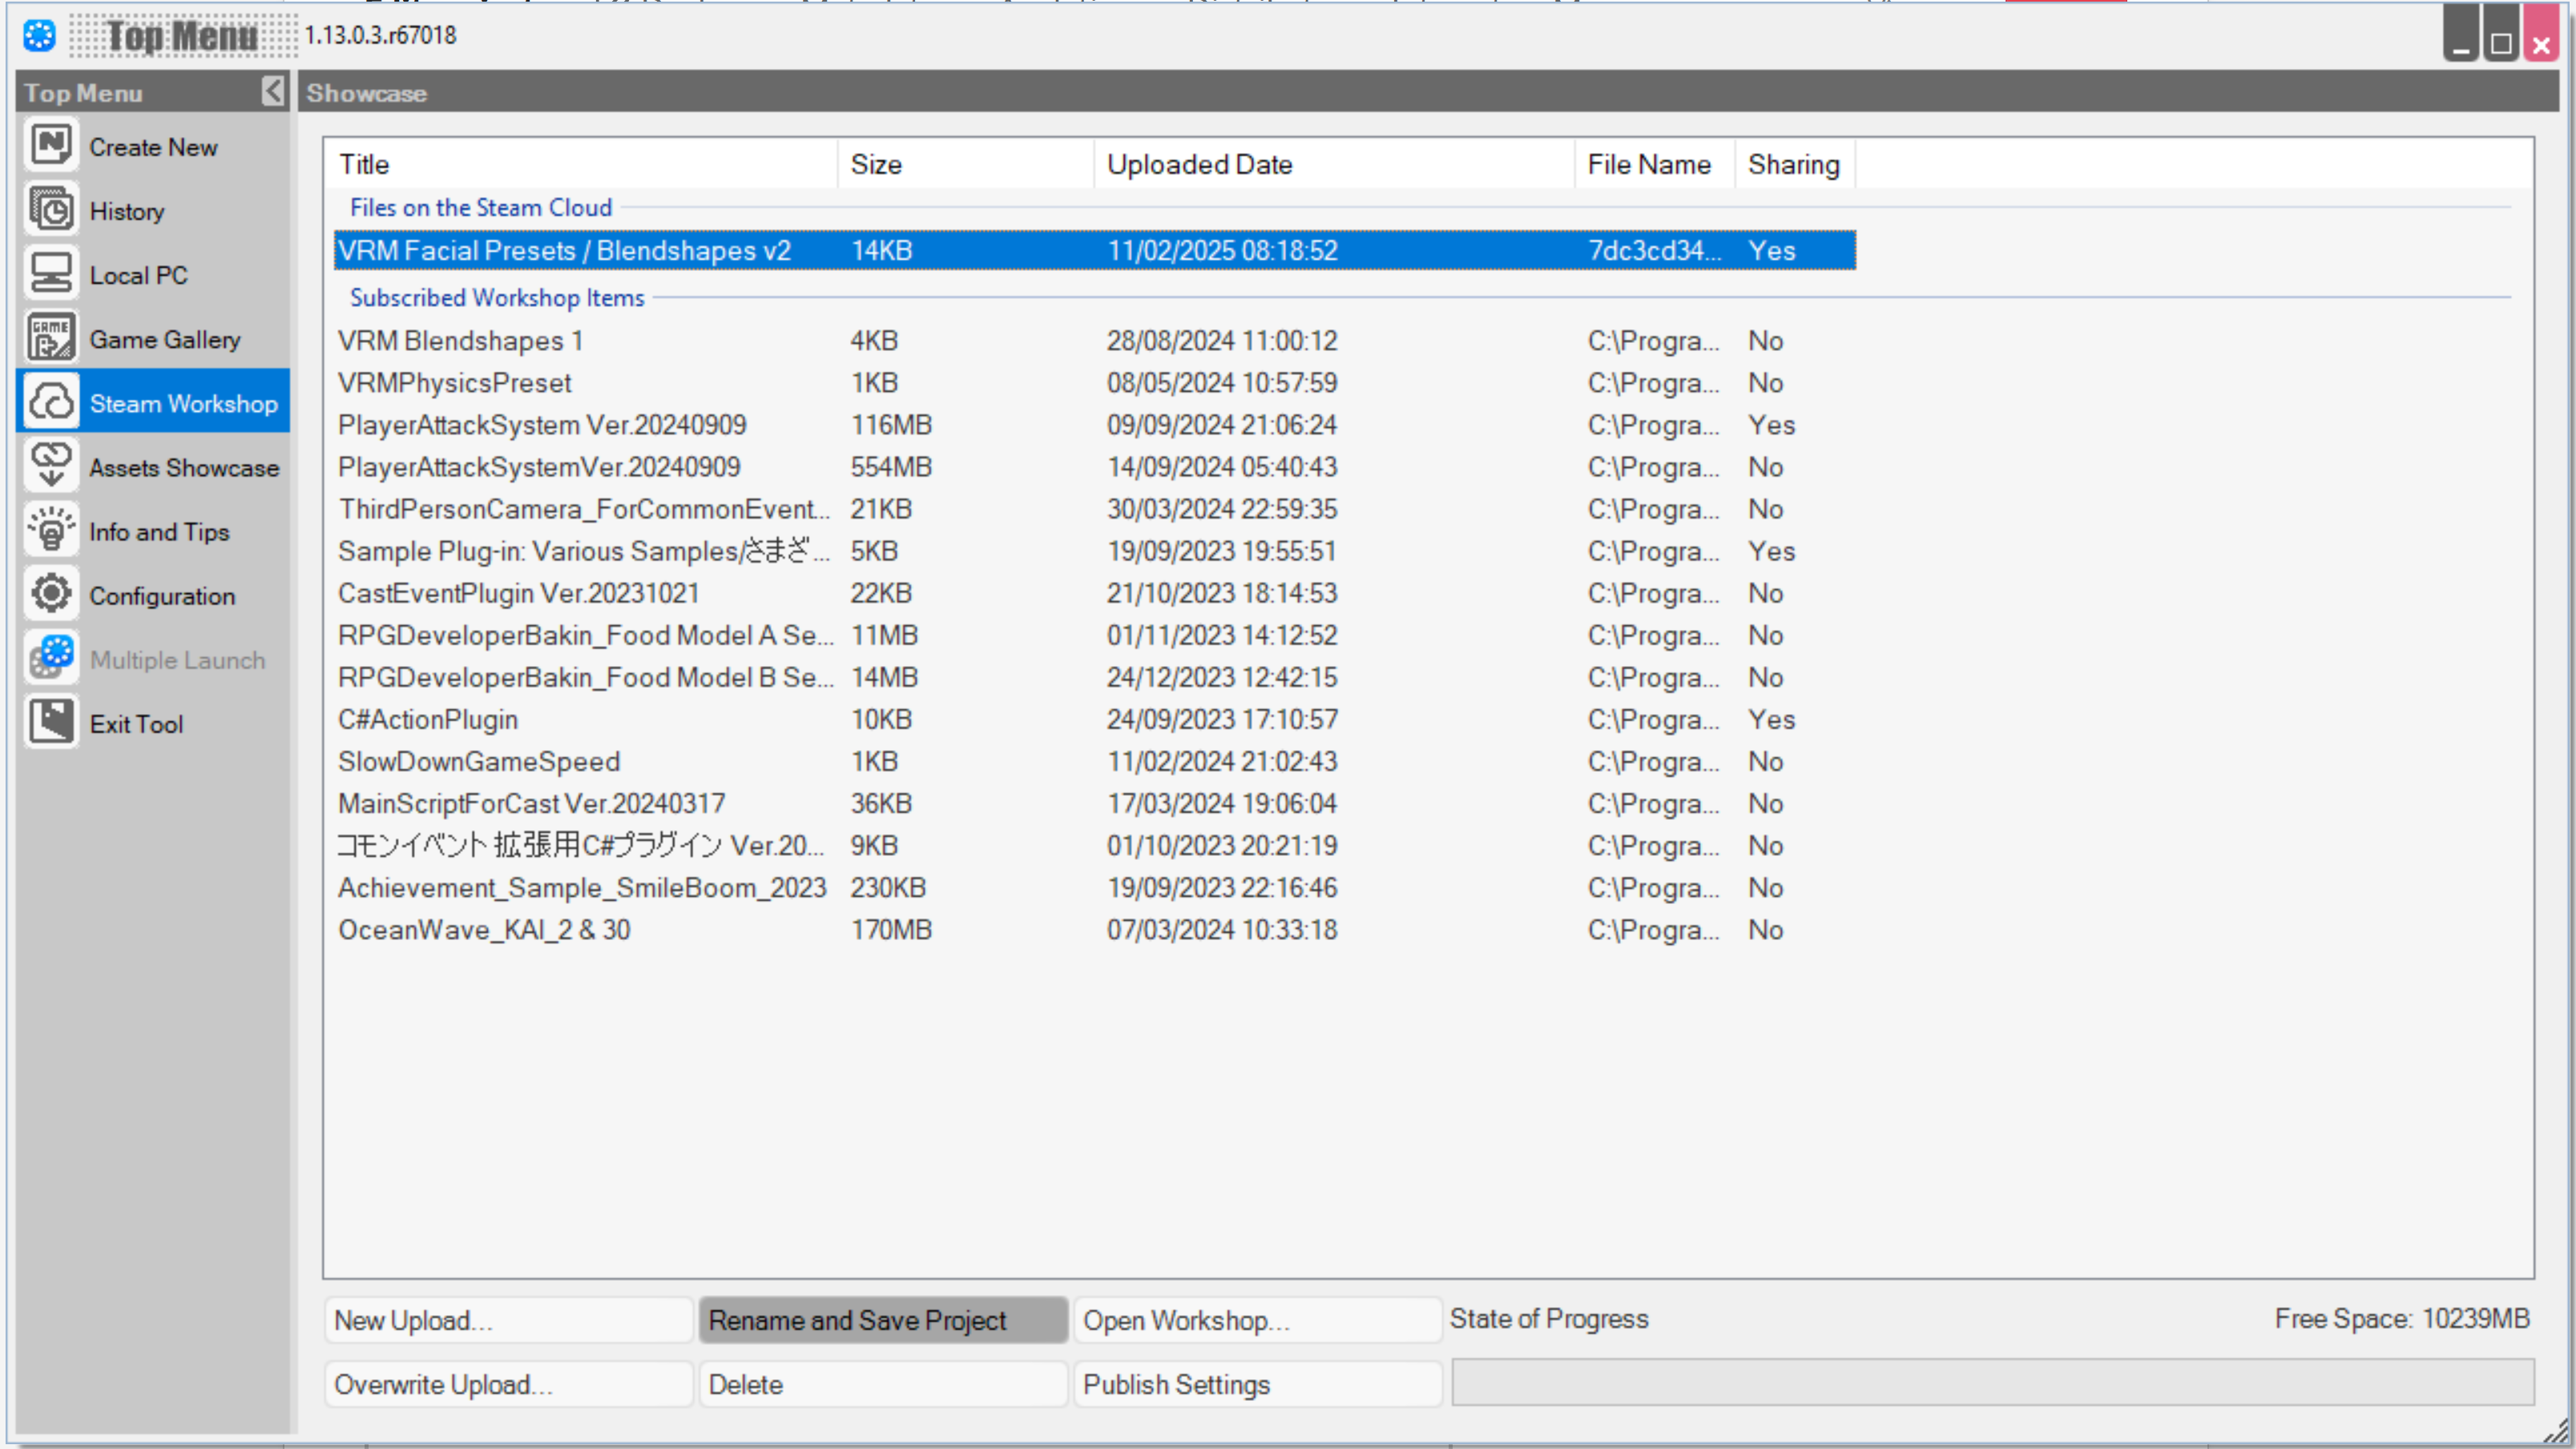
First, subscribe to the preset over on the Steam Workshop. Then, inside of Bakin's home page, go to Steam Workshop, select the VRM Facial Presets v2, and click Rename and Save Project. Save the zip file anywhere and extract it, then open your game project and head to Resources -> Blend Shapes. Import the file where you extracted it and accept the import.
Next, go back to 3D Stamps, locate your model, and in the Blend Shapes field on the right, click on the empty space and select the VRM Blend Shapes preset. Your model will now be able to express emotions through events.
Usage in-game: You can call the "Apply Blend Shapes to Player" event to apply the blend shapes to the player, and "Apply Blend Shapes to This Event" event for NPCs or any Battle Actors, including allies (use Make Battle Cast as Operation Target for battle actors). There isn't a way to affect the Party Train models however.
Several of them can be applied simultaneously if you don't override previously assigned keys.
For any future model you add, do not need to create a duplicate VRM Facial Presets object, all models can use the same set. Some presets are used by Bakin's systems, such as "blink" (eyes closed) and "talk" (mouth open) for Conversation events.
Physics & Collision
Compared to the old method of using FBX files, VRM models will automatically come with a predefined collision capsule, but this may not be ideal for some.
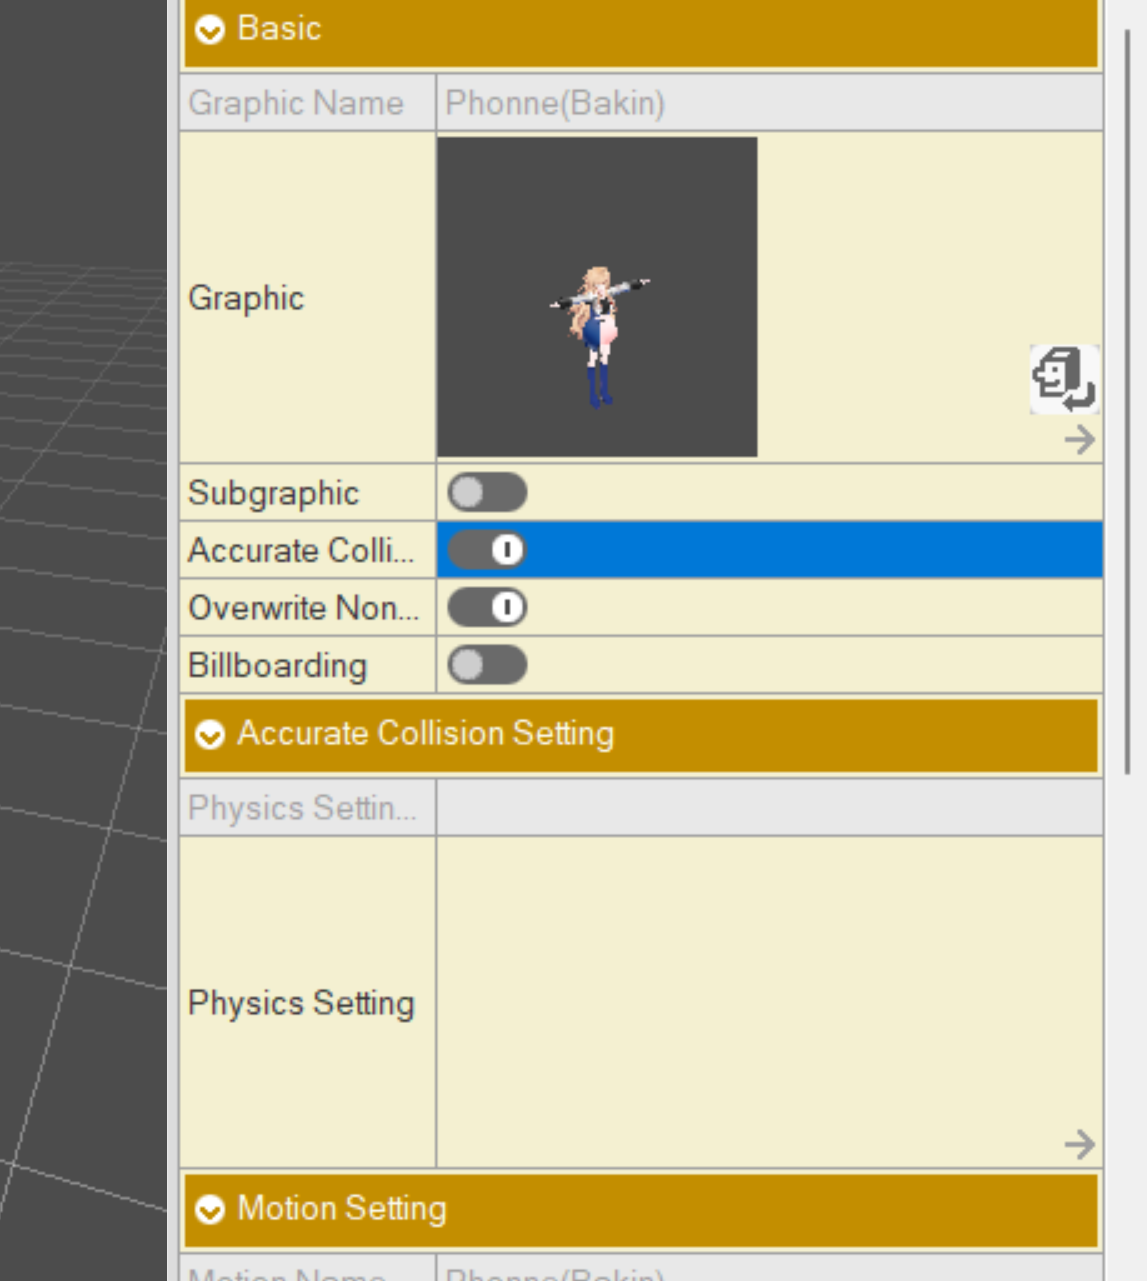
To use your own set of physics / collision, enable Accurate Collision and click on the empty space near Physics Setting to change to a different one.
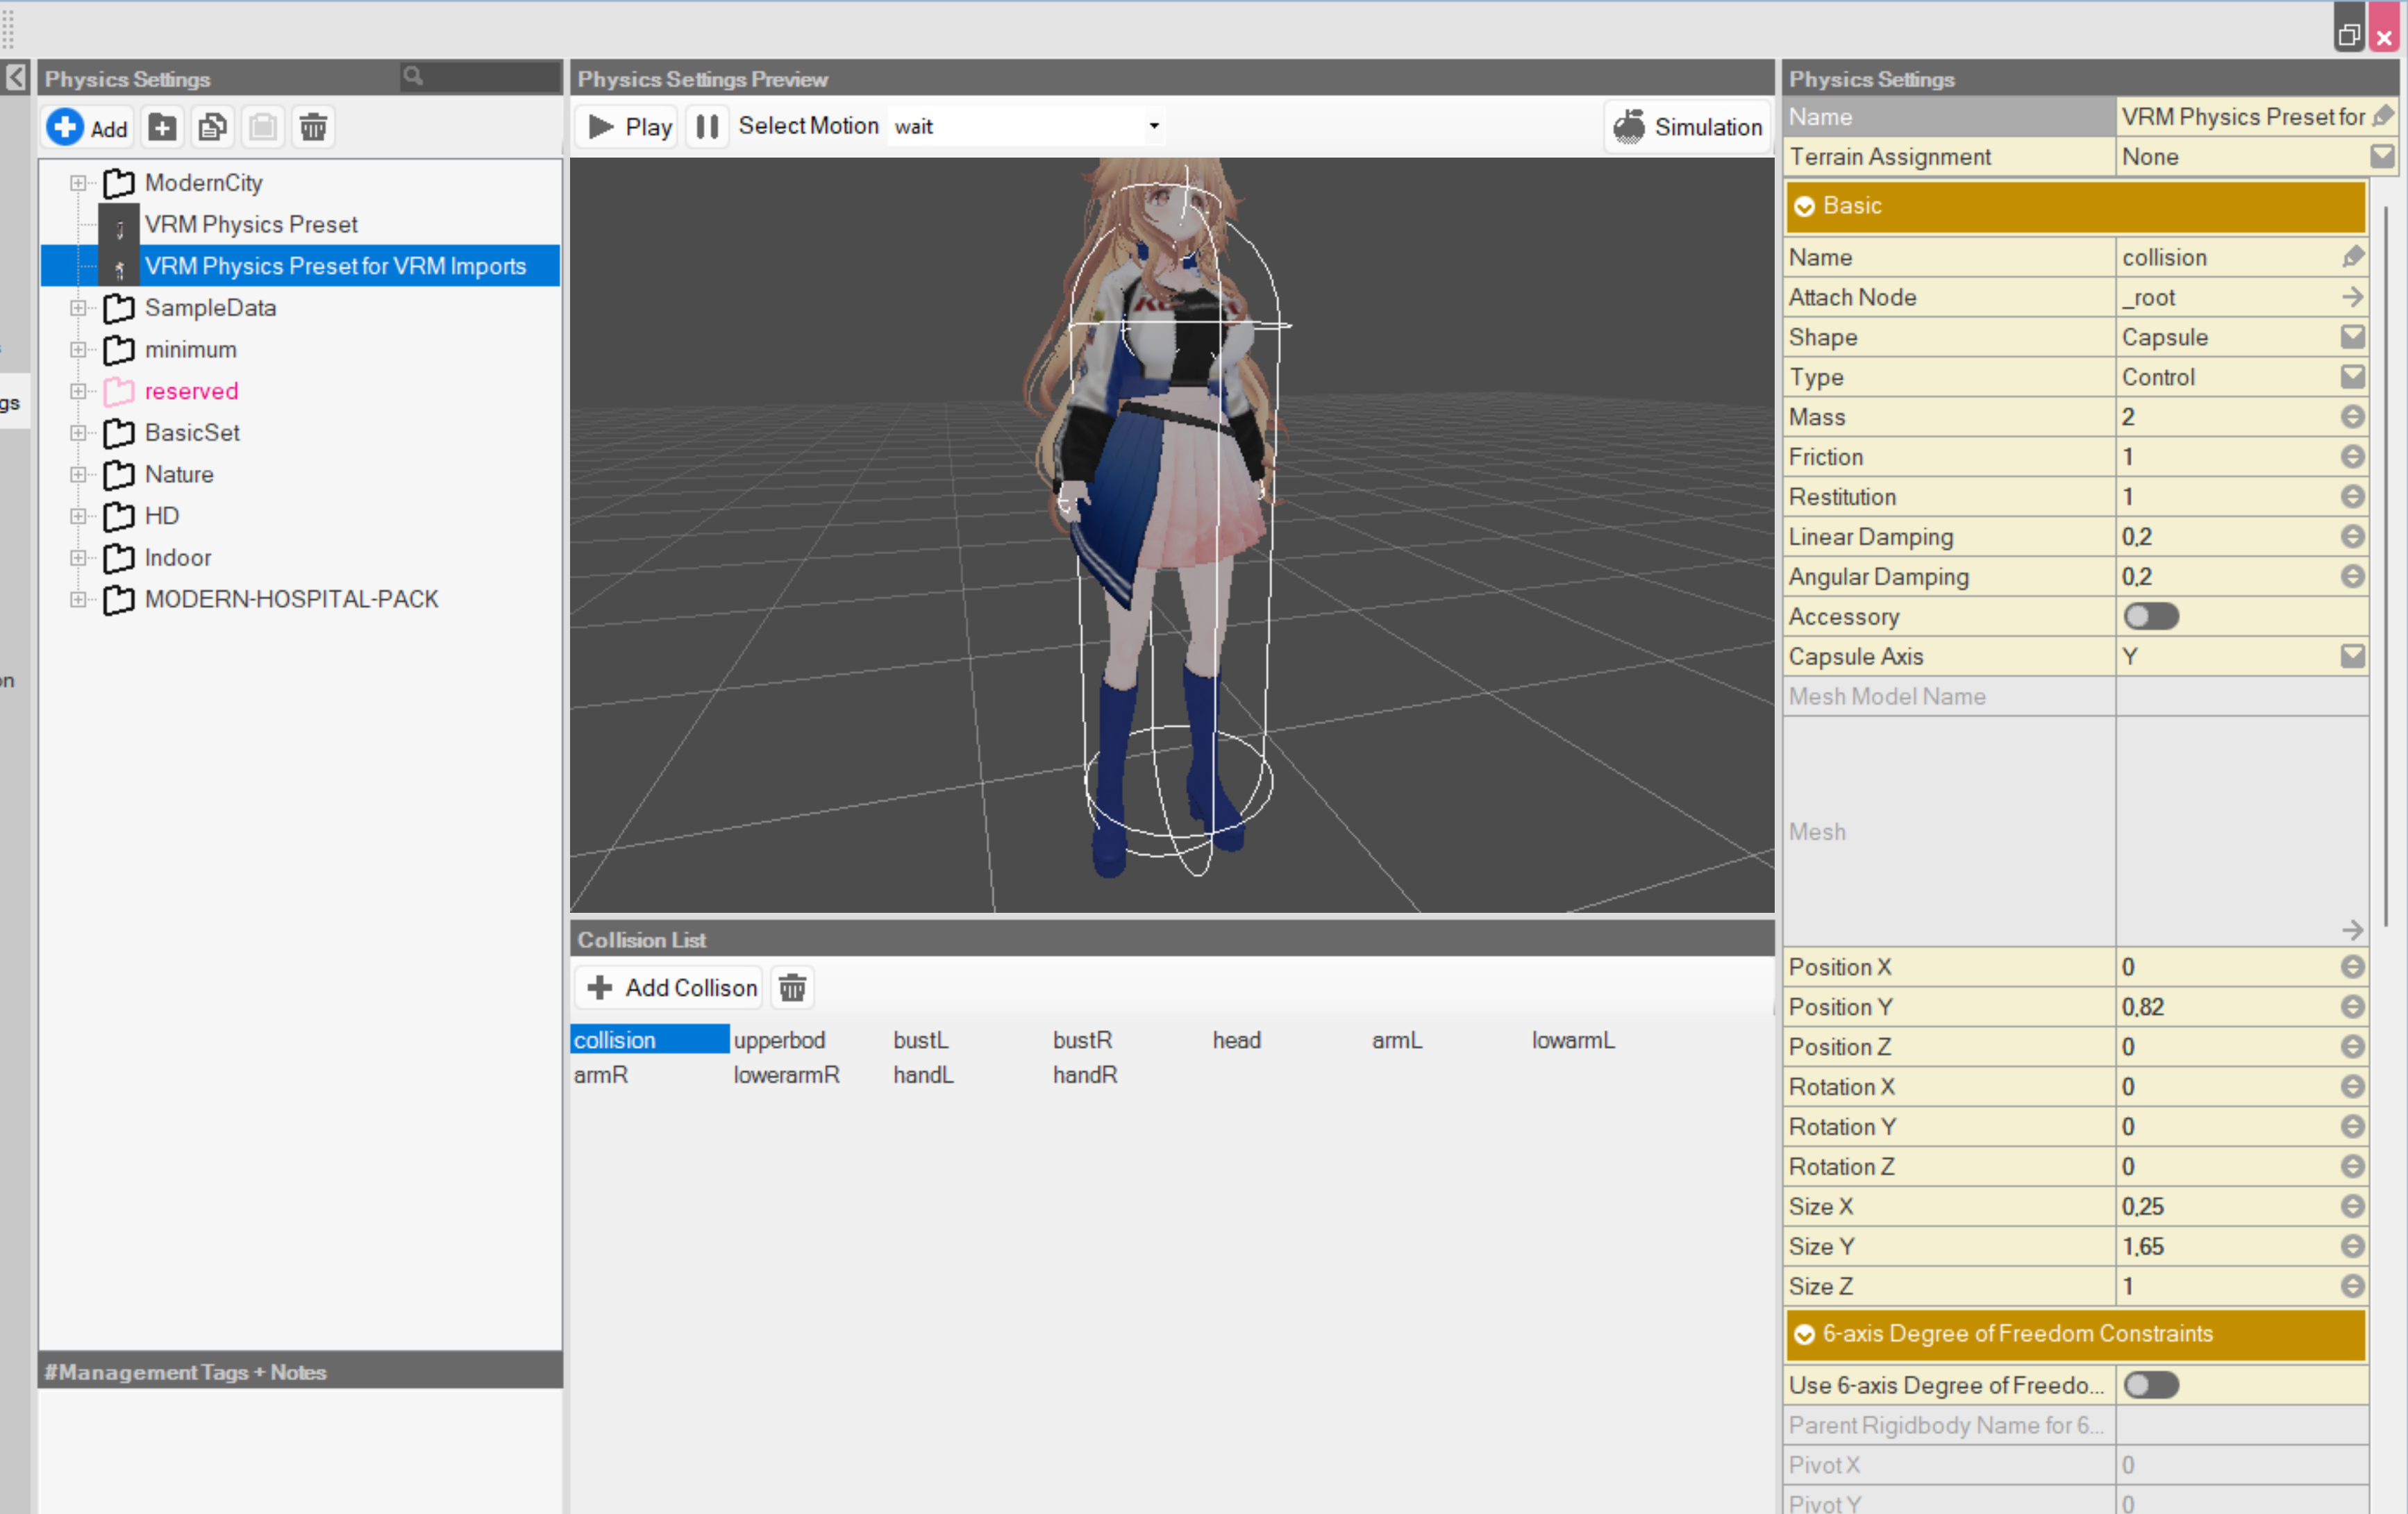
The physics objects not only handle event / object / terrain collision, but they can, when programmed right, also handle a different kind of dynamic physics from the VRM native ones, and both can co-exist at the same time.
I've launched a while back a VRM Physics Preset on the Steam Workshop back when FBX were the only option, and it does handle breast physics collisions (unlike the default collider) that can react to the arms, in addition to a more accurate hitbox for floor alignment. With the baked-in physics VRM provides, you can tone down the bustL and bustR physics a lot, but otherwise it should work with the VRM imports as well. For male characters, duplicate the physics object and just remove the bust physics.
You don't have to use this preset, but it's worth checking out later when you're trying to figure out why the feet are hovering over the floor.
Motion
VRMs will initialize with a set of pre-built animations in Bakin: however, due to armature differences, adding animations to the prebuilt set will result in animation corruption. For this reason alone, you must change the motion object.
Replace the motion by clicking it, then go to the Resources tab (not the default Ready to Use tab), and select the VRM model. This will create a new motion object for that character.
However, we don't have any animations now. Save your work in Bakin, because now we have everything we need to make and import animations for our new character.
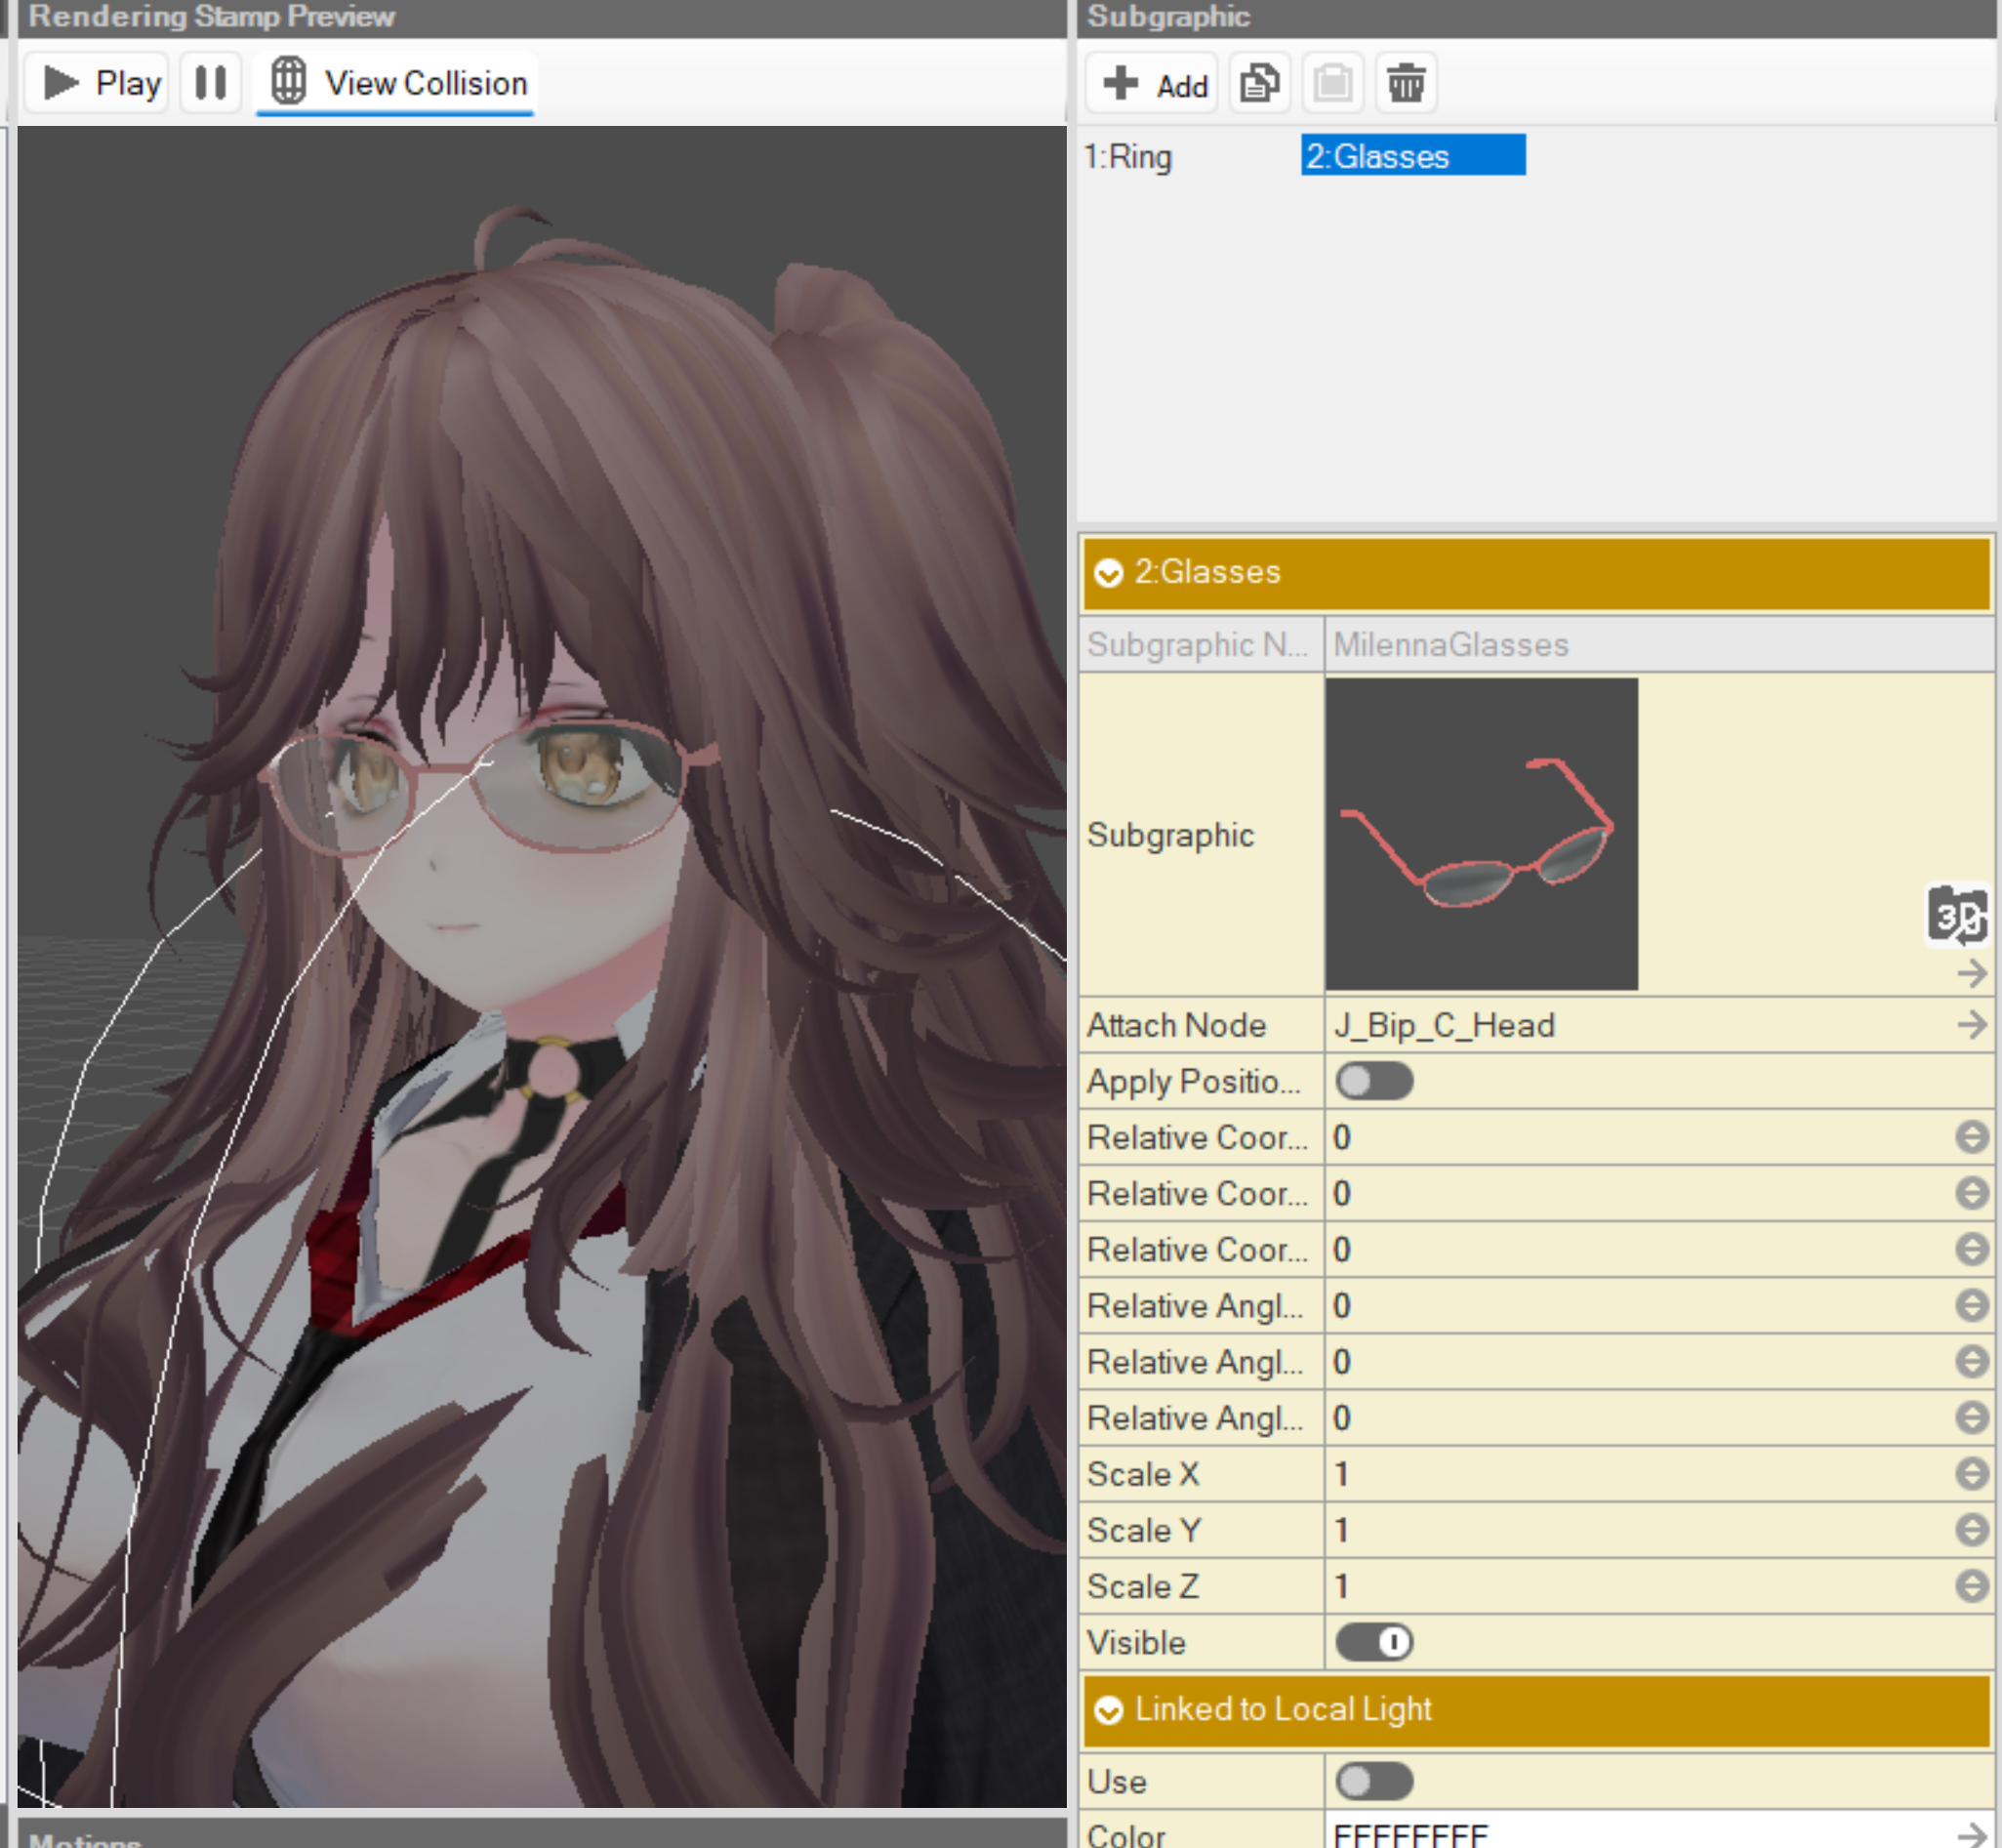
(Glasses only) Adding glasses back to your model
If your model doesn't wear glasses (or you don't need the ability to turn on/off glasses), skip this section.
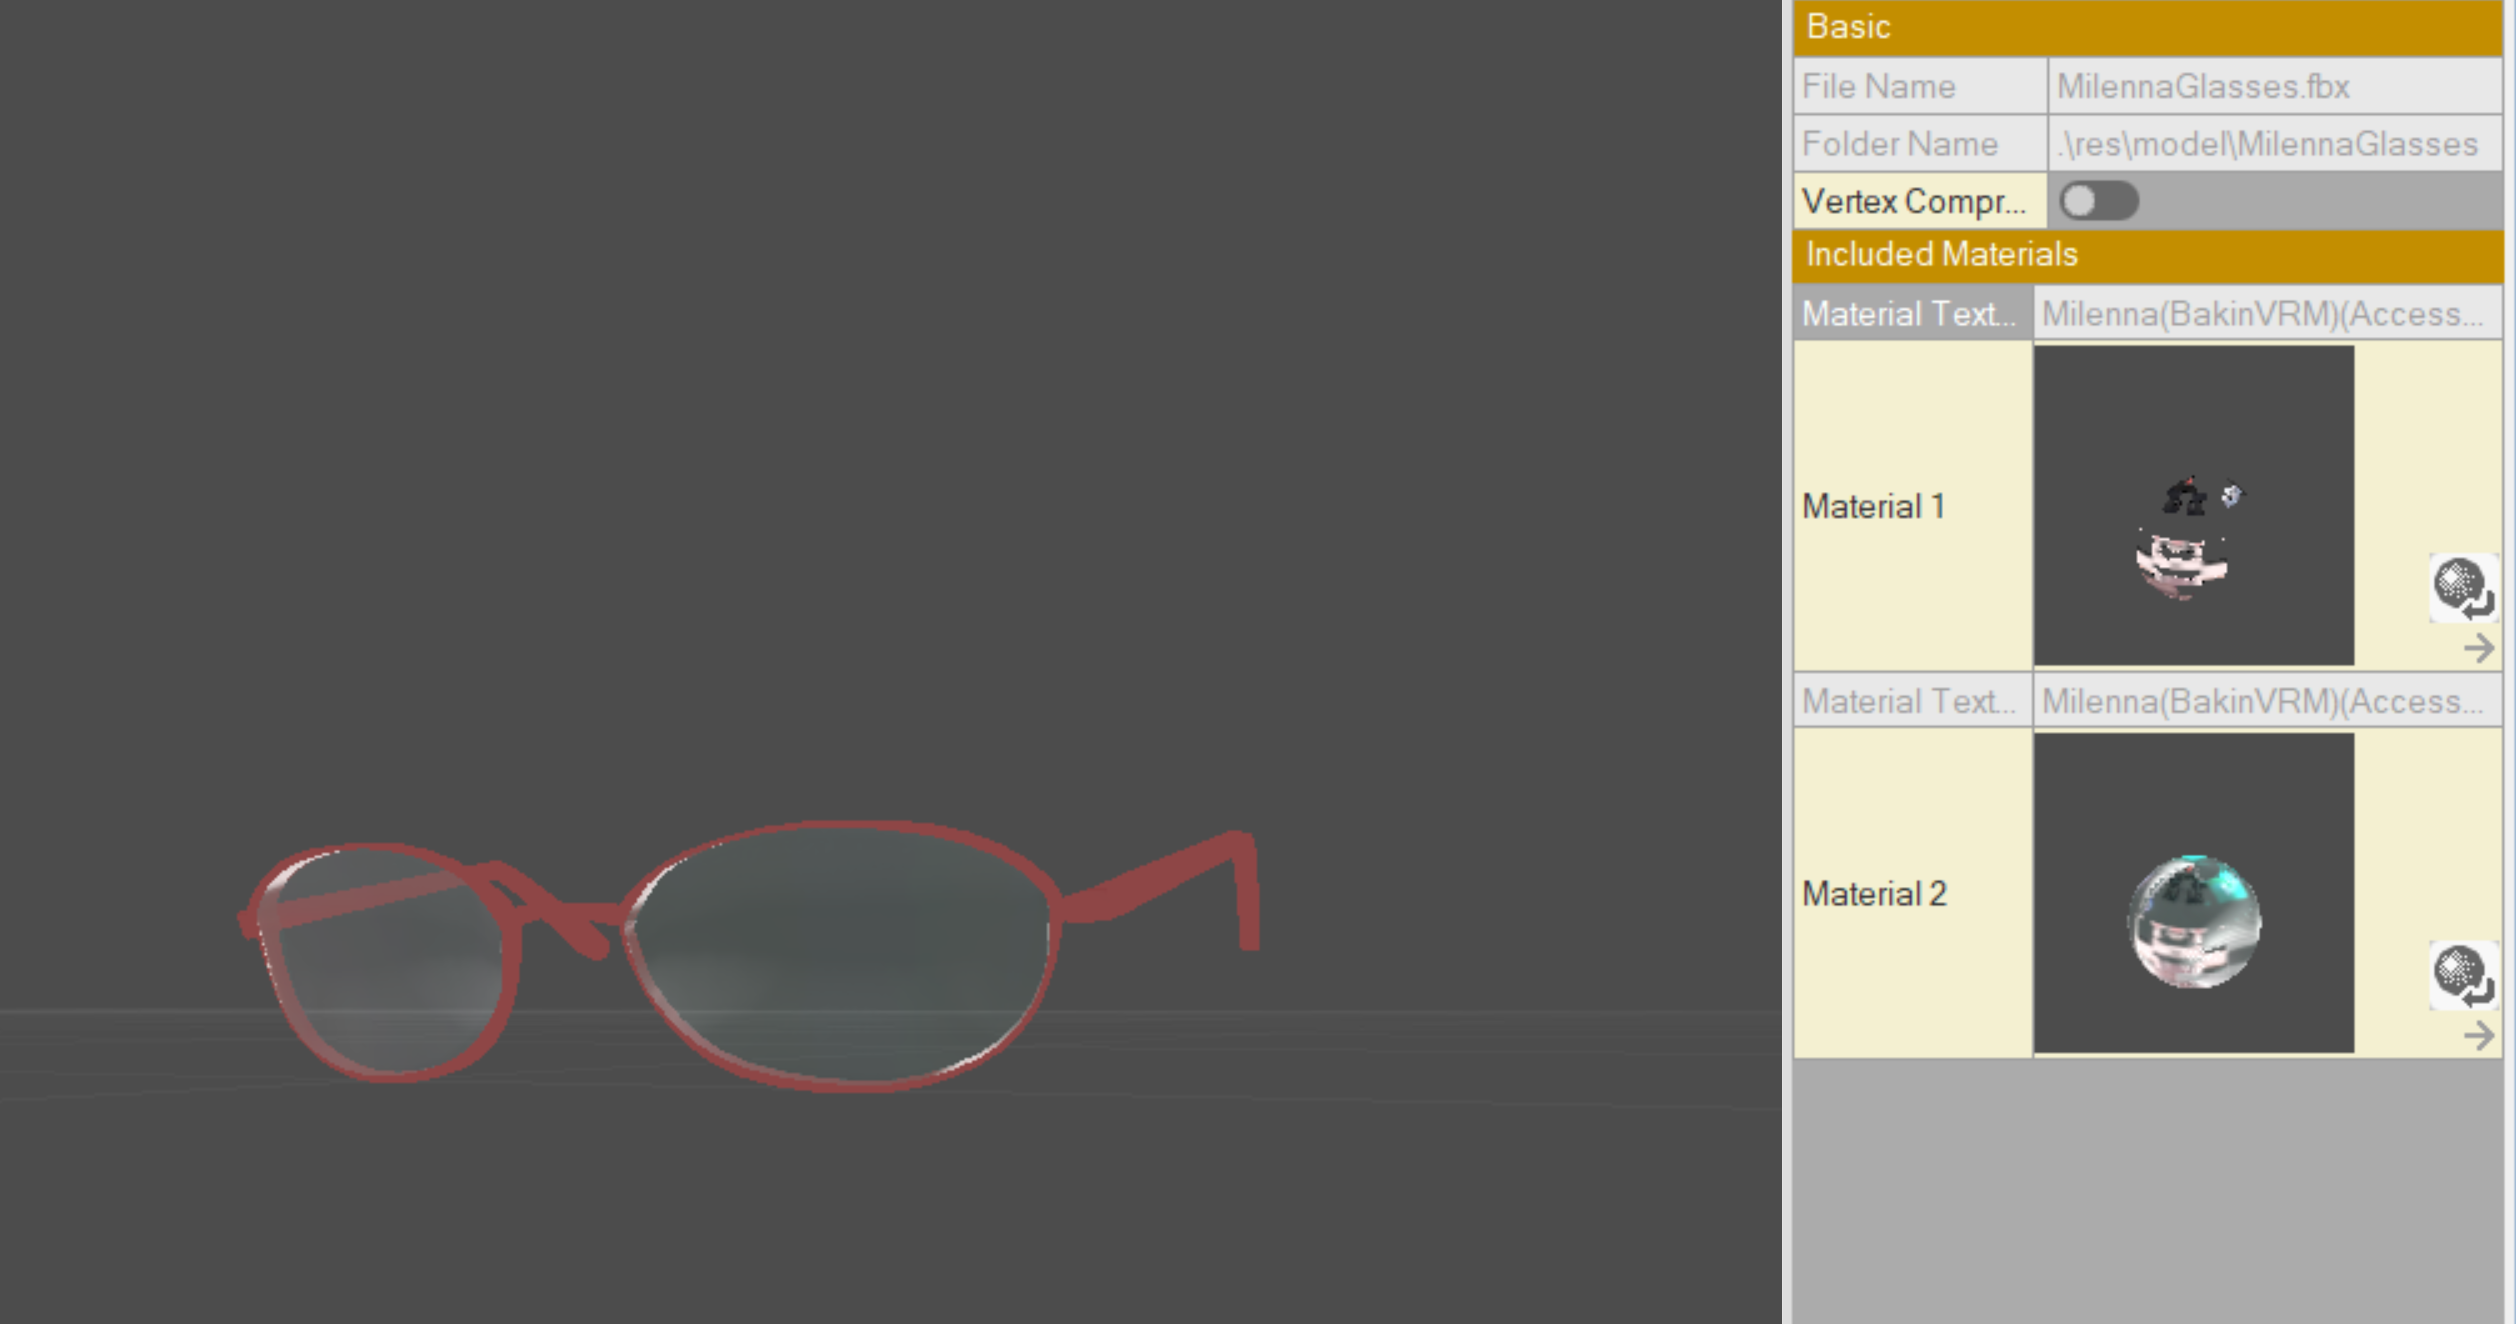
v5.2.0 of the VRoid for Bakin add-on adds the ability to split away and export the glasses/eyewear of models into a separate FBX file. If you've exported a VRM that had their glasses taken away, here's how to add them back.
- Import the glasses that got exported into a new 3D Stamp.
- You'll notice the materials are wrong. Navigate to the Models tab, and then find your glasses again, and re-assign the materials from the white ones to the glasses materials attached to your VRM model. They normally have the word "glasses" contained within them, but one is for the lens, and the other is for the rim.
- Back into 3D Stamps, turn on Accurate Collision on the glasses and leave the physics empty.
- Go to your VRM model's stamp, make sure Subgraphic is enabled.
- Press Add in the Subgraphic panel, select the new subgraphic, fill in the Subgraphic field with the newly found glasses model.
- Lastly, change the attach node to J_Bip_C_Head.
You can then toggle the glasses on/off through events. If you want the model to start by default with the glasses disabled, set the visible switch to off.
IV - Making custom animations
The creative aspect of the tutorial is here. I'll be describing some of the possible avenues you can either create or bring over custom animations beyond just the Mixamo ones.
Basic Methodology
This is the general chronology of things to do when creating one animation:
- You open the Main Blend in Blender.
- Save the Main Blend as a new file in the same directory as the Main Blend, ideally name it CharacterName_AnimationName.
- Through whatever methods described in the tutorial or your own, you apply the animation to the VRM model in this blender scene: it must be on the timeline, or if it's been pushed onto an NLA Strip you must enter editing mode for that strip.
- When the animation is complete here, save your work in the animation blend.
The VRoid for Bakin plugin wasn't designed with multiple animations in one file, so each animation will need to be its own blend file, and eventually its own FBX.
We'll go through two different scenarios that I have experience with, choose the method depending on the animation you want to make.
Scenario A: Mixamo / Actorcore / third-party animations, retargeting and adjusting them to the VRM model's physique
Whether you use Mixamo, Actorcore, or any other website or marketplace that offers motions, you'll quickly notice the VRM model will not be very usable on their own.
- Mixamo is compatible, but the arm spacing will often be an issue (sunken arms syndrome), and 9/10 times, the site will refuse to use your model, and even still, it might break it!
- Actorcore uses a different bone structure entirely, making it incompatible. Uploading the model will change the bone structure as well, making it incompatible with Mixamo animations and more.
- Could be a similar scenario with animations ripped from Unity or Unreal's marketplaces or asset packs, but I don't have any experience with those.
So long as you have the FBX motion, however, you can retarget the animation to your VRM model using the Blender Animation Retargeting addon, and, with the usage of my VRM Spacing Animation Baking addon for Blender, you can then adjust the posture of the entire animation, be it the legs, arms, head, etc.
Retargeting the animation
- Download from either Mixamo, Actorcore, or wherever, the animation you want in either FBX or "Blender" (Actorcore) compatible format.
- Make sure the framerate is set to 60 FPS.
- Make sure you're only downloading the armature, referred to as skin on mixamo, by disabling the export of it.
- On Mixamo, make sure you're using the default model they use on the website, and not an uploaded model. On Actorcore, use the female robot default when downloading the animation.
- Open the Main Blend, save as a new blend file in the same directory as Main Blend and call it ModelName_AnimationName.
- File -> Import -> FBX, and then find the animation you've just downloaded.
- If the add-ons panel isn't showing, press N to toggle it on / off, and then scroll and find the Retargeting tab.
- Select your VRM model (not the animation) in either the 3D view or hierarchy.
- Follow this short video tutorial for the procedure on retargeting the Mixamo animation to the VRM model:
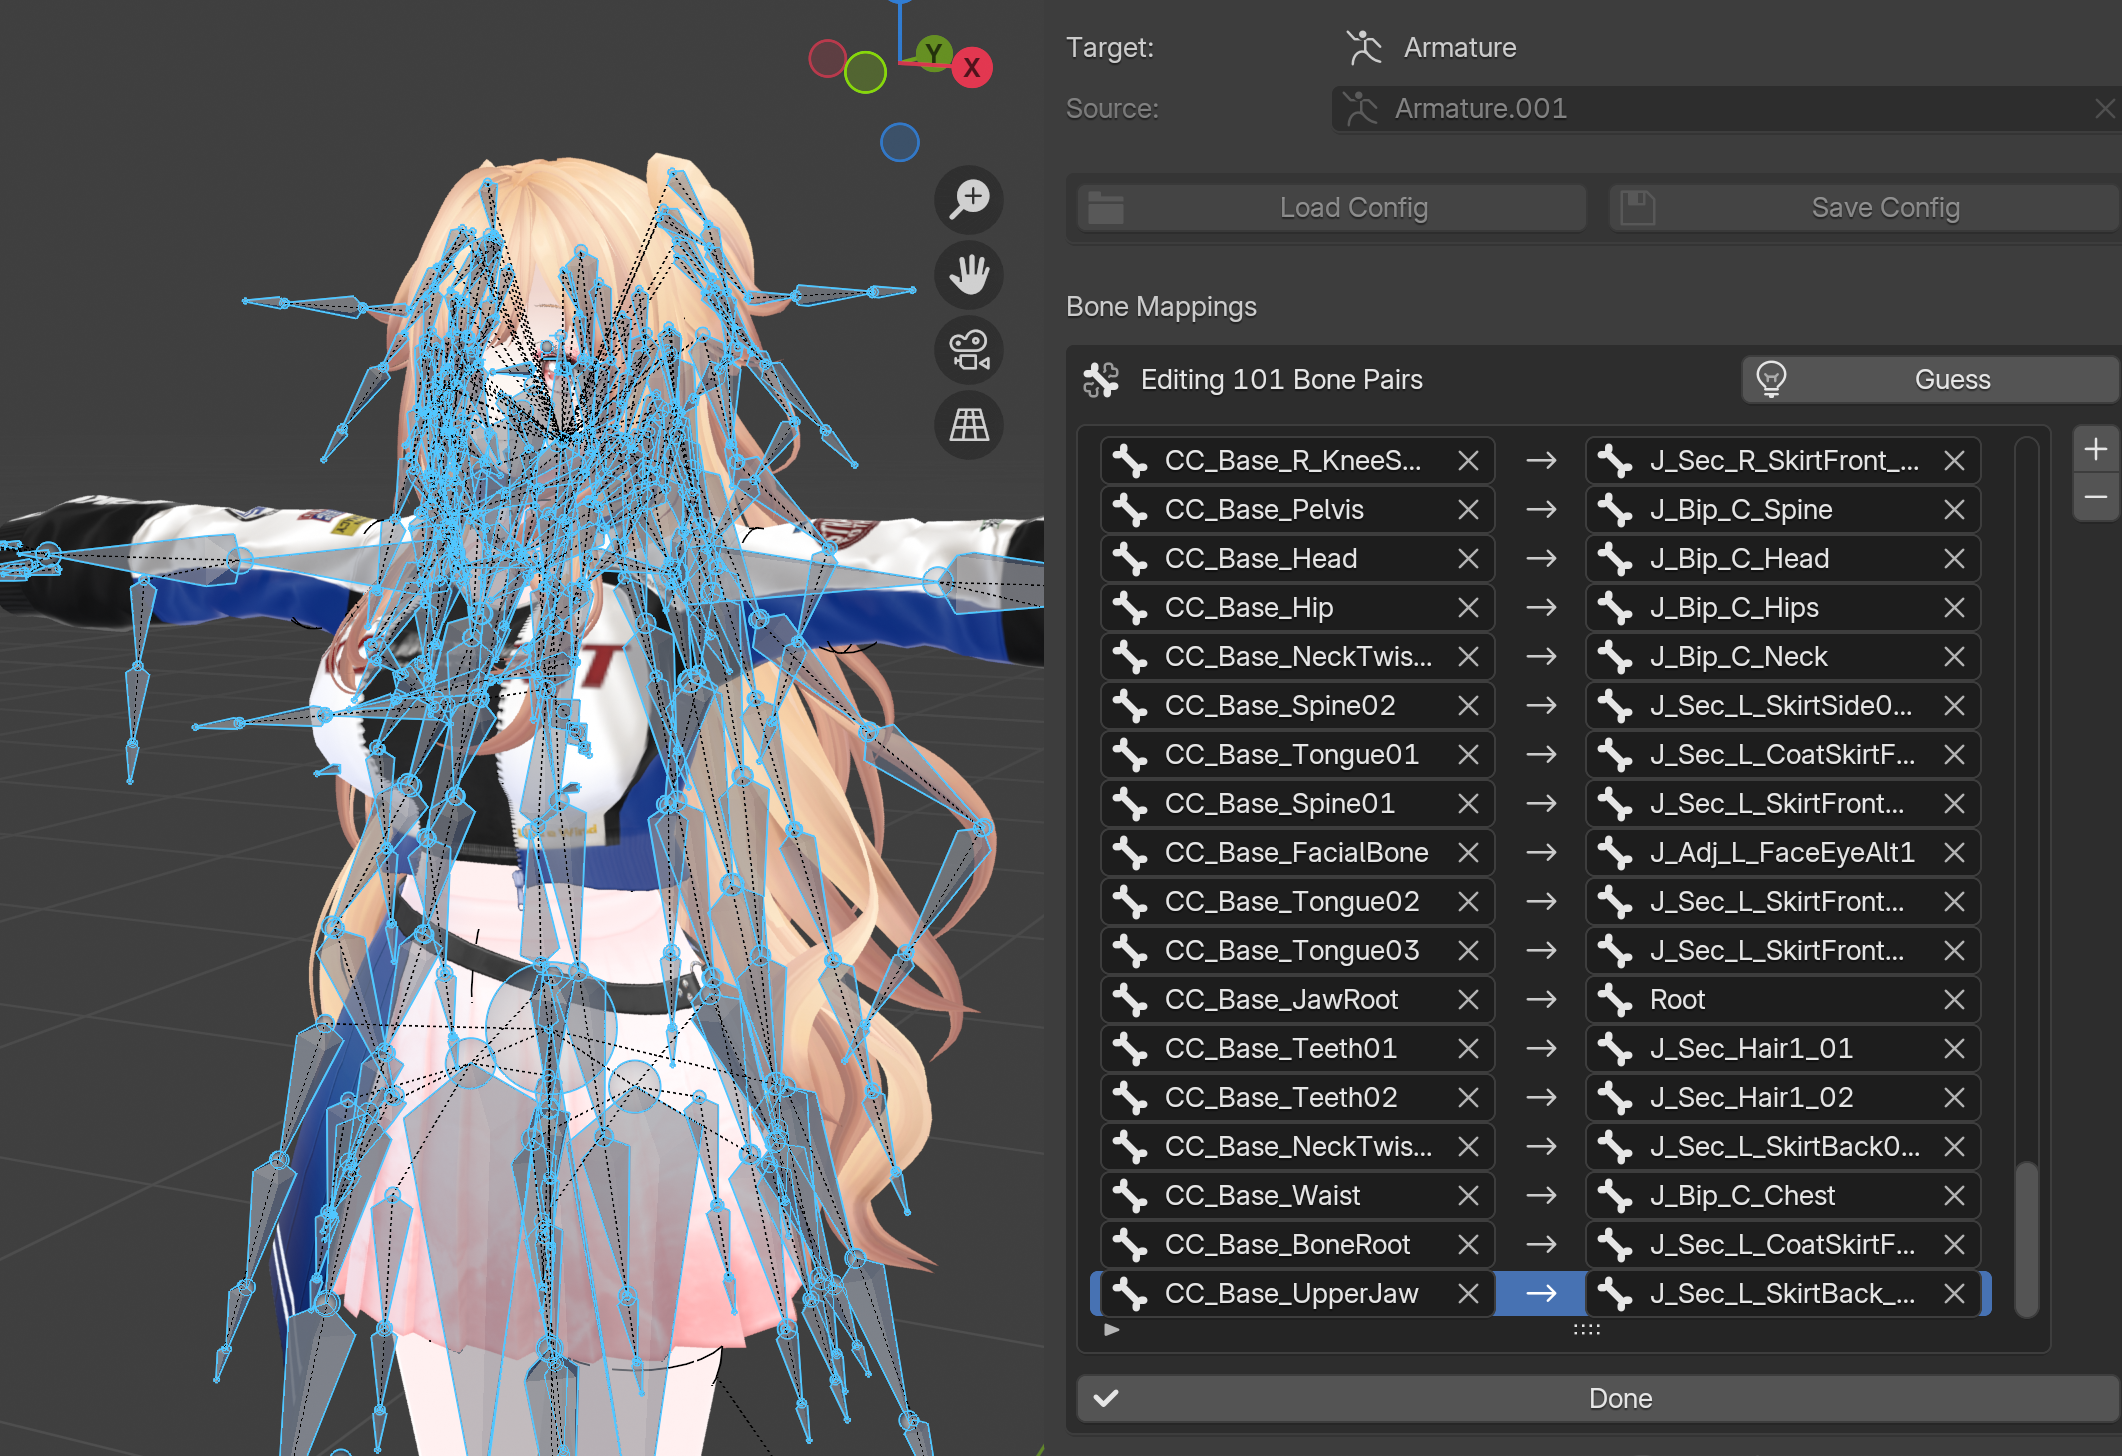
⚠️ In this video, we use a Mixamo animation, which automatically guesses the correct set of bones. When using Actorcore or other sources, there is a good chance your VRM bones will be incorrectly guessed by the addon and will result in incorrect animation.
To fix this, you'll need to change the right-side bones to correspond with the bones in the same position as the Actorcore armature. The most important bones to fix are the two spine bones, waist, pelvis, hips, root, and fingers, the rest shouldn't affect anything in the animation. It is tedious, but once you've found the mapping that works, you can press Save Config and create a config file, so that any other animation for the model using that armature can be sped up by using Load Config.
If the animation looks perfectly fine, you can skip straight to part V of the tutorial, otherwise you should try adjusting the pose with VRM Animation Spacing Baking.
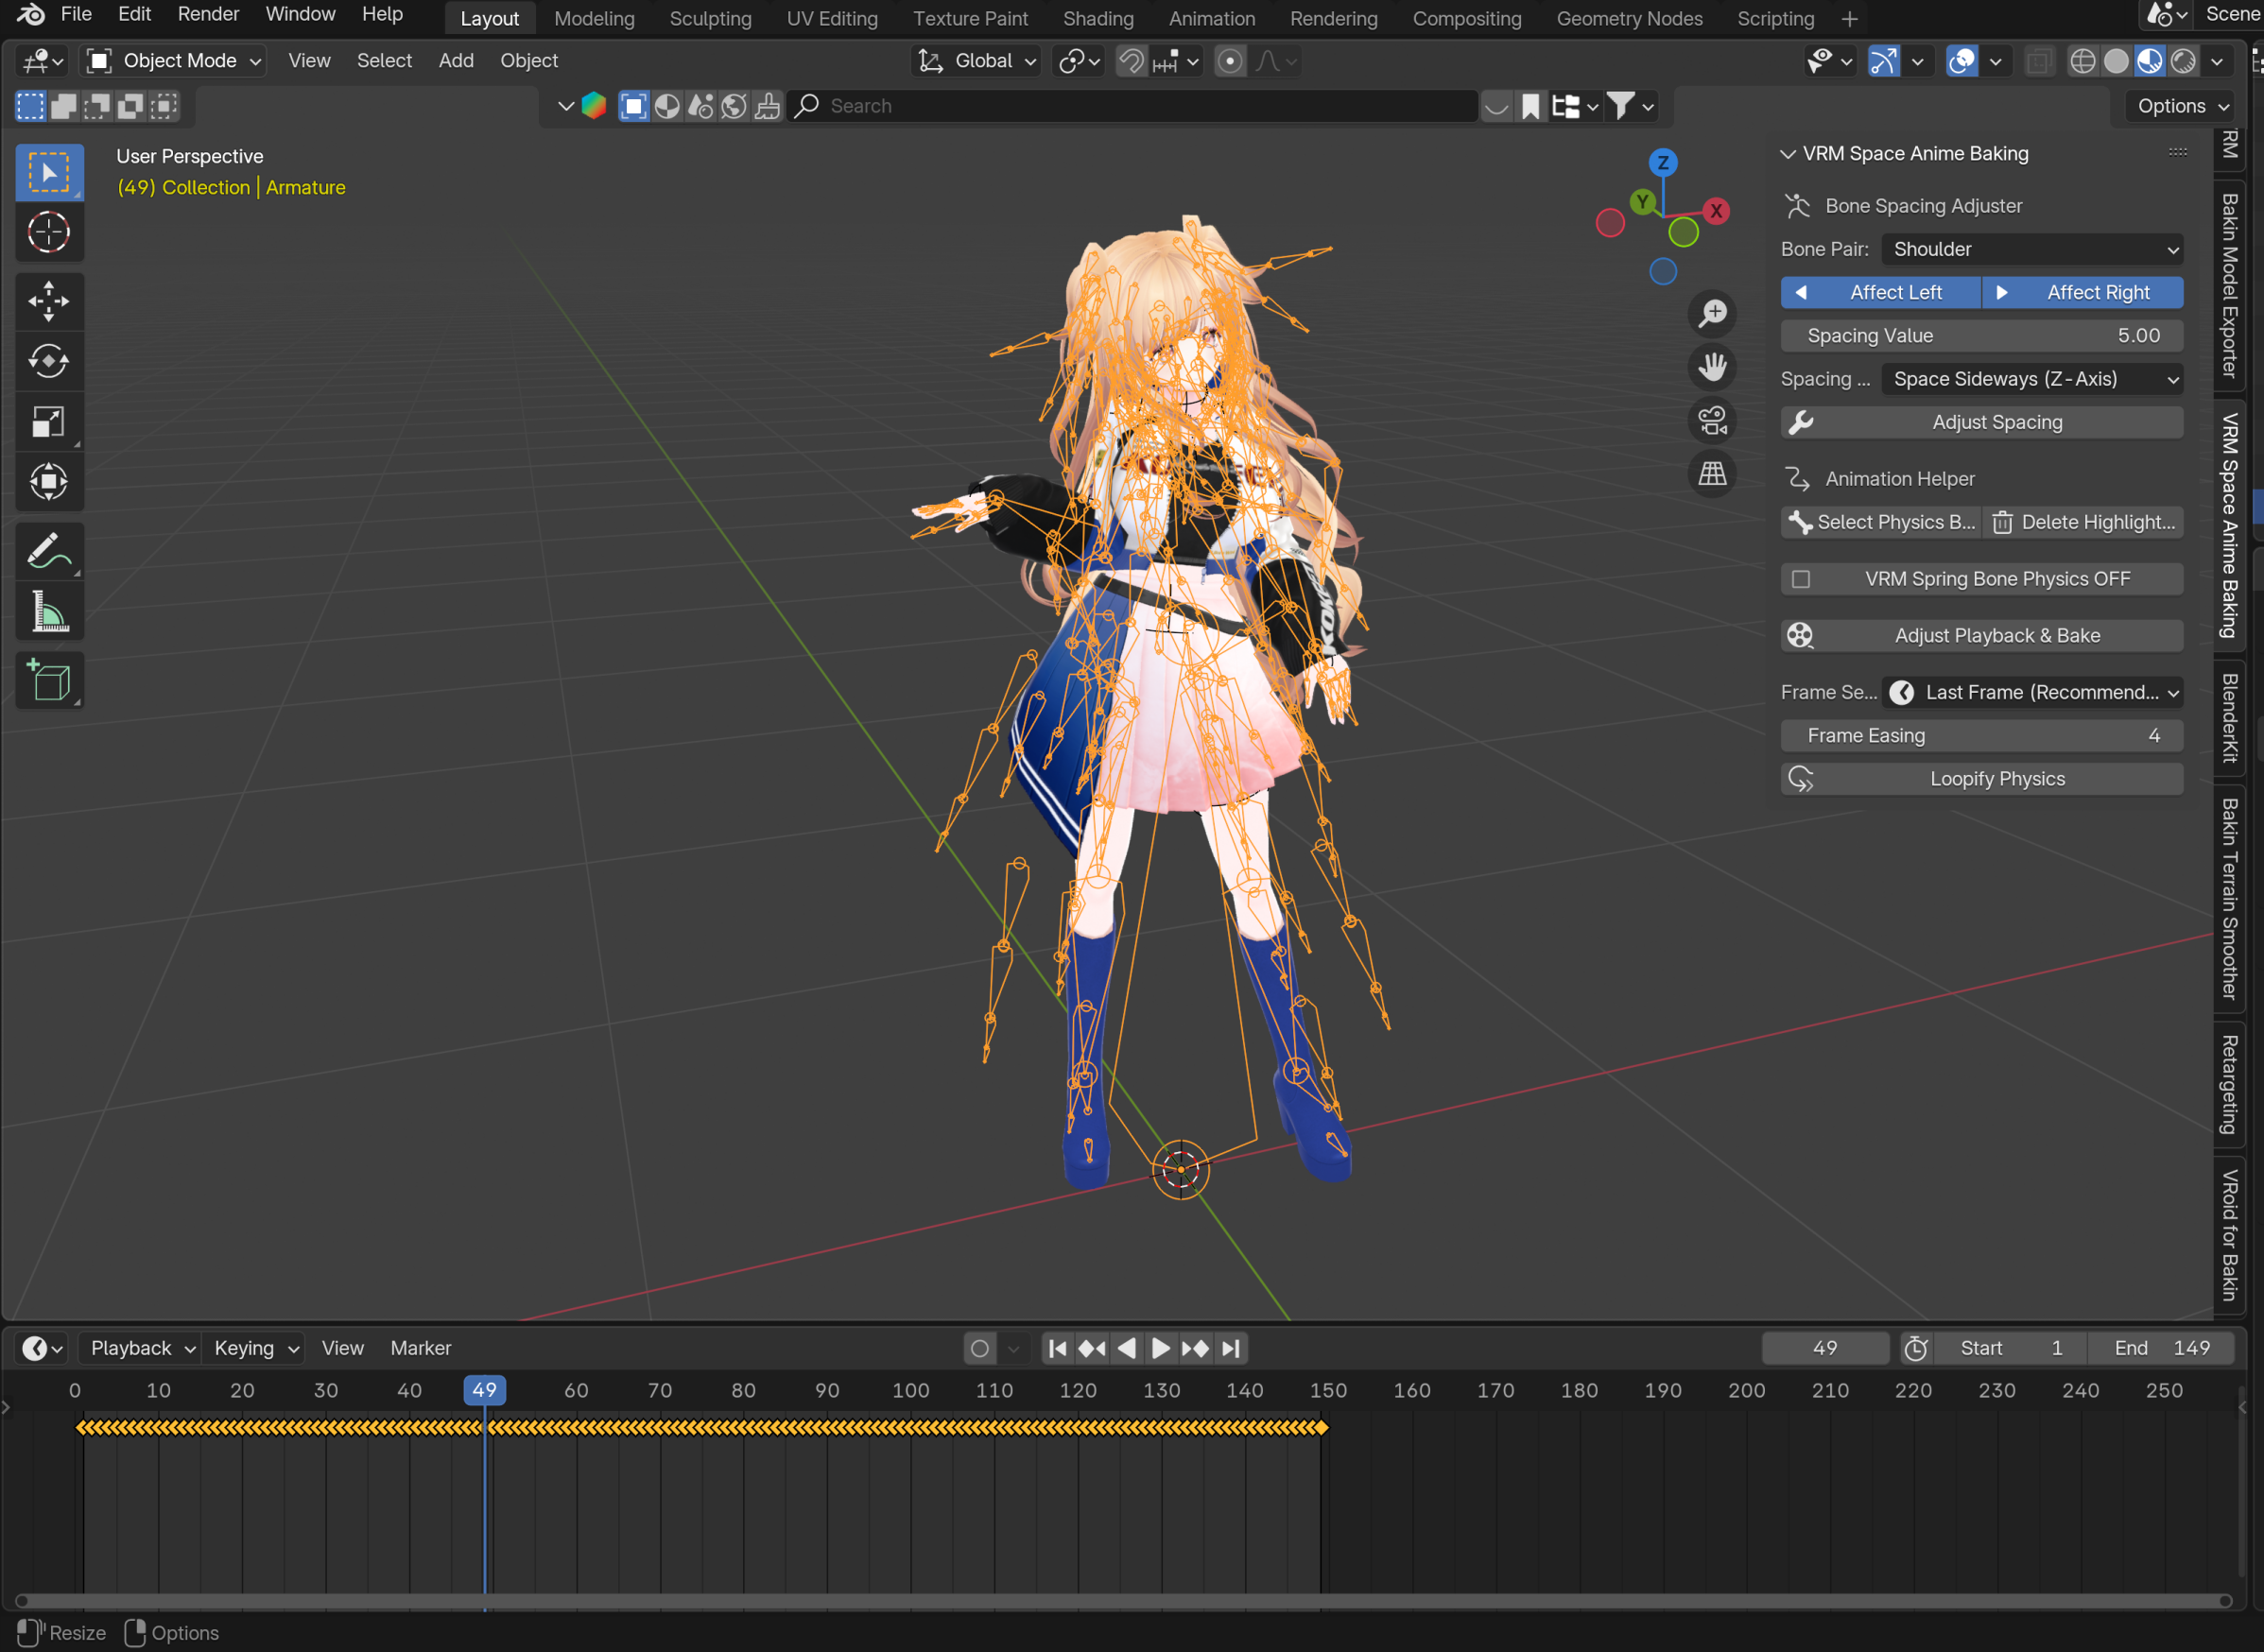
Adjusting the posture with VRM Animation Spacing Baking
After the animation has been baked to the VRM character, you can use the VRM Spacing Animation Baking addon to adjust the posture of an entire animation. As the amounts to apply and the bones to work on are going to be based off your motions, this quick video demonstration will show how to use it.
When you are satisfied with the look, scrub through the timeline to make sure it looks right in motion, and if so, save the animation blend, then head to part V of the tutorial.
Scenario B: Your own animations using VRM Posing Desktop
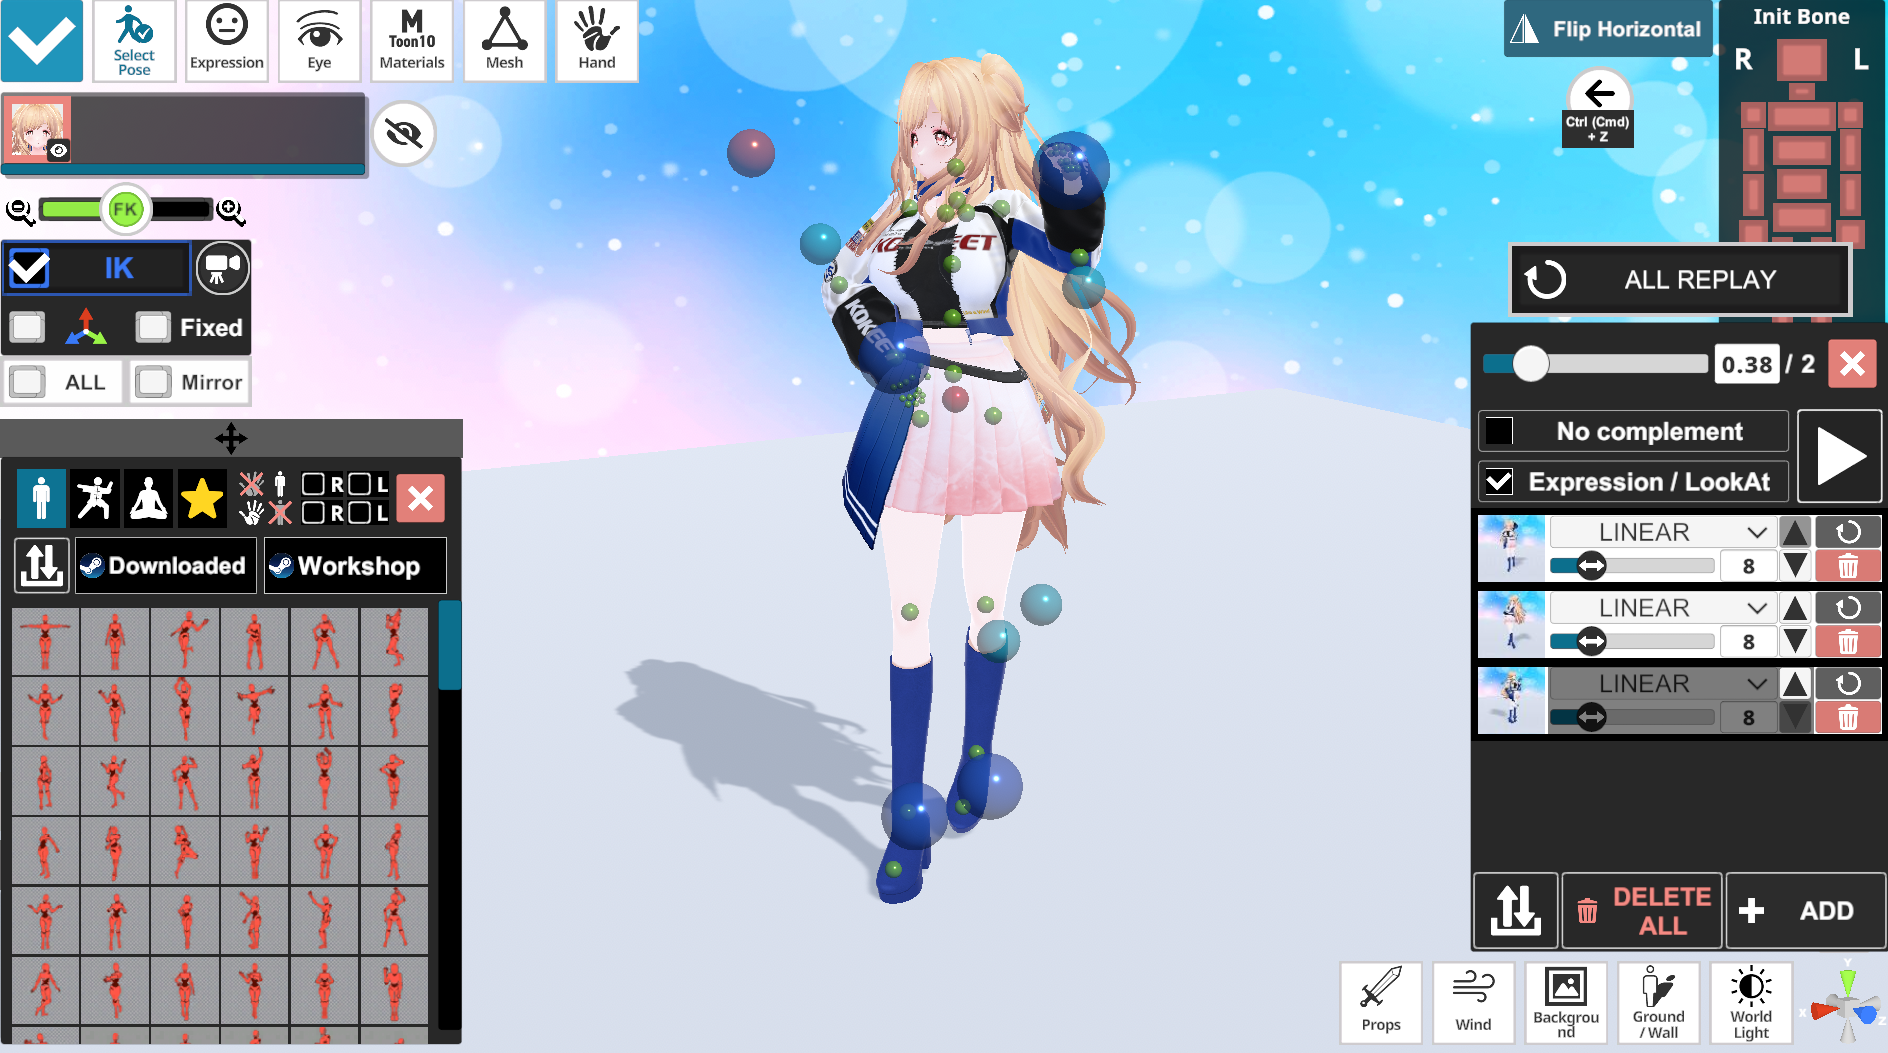
If you need to make animations that are more tailored to your game, then I'd strongly recommend the usage of VRM Posing Desktop. It is a paid app on Steam, but it is worth the price, as it offers an excellent posing system with its IK rig, tons of reference poses to build your animations out of, and can export into VRMA files, which require no retargeting shenanigans to get them working with your model in Blender.
The only downside is that the animation interface is downright cryptic without any documentation, presented in a very nonstandard way, and if you've noticed a little issue in an animation (like, say, pose hovering over the floor), you'll need to painstakingly edit each problematic bone in each keyframe, without really precise numbers to refer to unless you like opening and closing the timeline view over and over for every frame.
Creating the animation in VRM Posing Desktop
Open the app, and click on the Replace button, then press the VRM button and load your model: you can either use the original VRM from VRoid Studio or the Blender exported one, but it doesn't matter here, since the app exports VRMA files, and VRMA files can be applied to any VRoid Model without issues.
Feel free to follow the quick video tutorial on how to create an animation from scratch. This is a creative aspect, so it's just showing you the methodology in creating an animation.
Once you're done and satisfied, it's worth saving it in both VPDLOOP and VRMA, so in case you need to edit it again, you can import the VPDLOOP file in VRM Posing Desktop. For our purposes, the VRMA file will be imported into Blender.
Bringing the VRMA into Blender
Open the Main Blend and save it as a new Blend file, in the same directory as the Main Blend, and name it ModelName_AnimationName.
Then, go to File -> Import -> VRM Animation (VRMA), and find the animation you've exported from VRM Posing Desktop. You'll need to scrub through the timeline to see the pose take effect, but at this point it's usable for part V of this tutorial. Don't forget to save.
In rare circumstances, even when you properly aligned the model with the floor texture (see video on how to enable it at the end), the model might just "float" over the axis of the blender environment. In this case, you can go into Pose Mode (top left drop down that normal says Object Mode), select the big bone at the root of the scene, enable the circle button (record keyframes) near the playback buttons, and move the timeline header to 0. Press A when your cursor is within the timeline area (not the 3D space) to select all keyframes for this bone, and press delete. Then, press G with your mouse over the 3D space to initiate translate, followed by either the X, Y or Z keys to lock the translation in a single axis. Mouse movement will move it along, and you can confirm with a mouse click, which will place the position correctly for the entire animation. Make sure to untick the circle button again if you're satisfied.
Scenario C: Making your own animations from scratch in Blender
You could in theory make your own animations by hand, through Blender, but I'm not a good animator in Blender.
VRM Rigify can be handy for this situation as an addon, as that'll give the VRM Rigify controllers (basically some form of IK control to pose more easily within Blender), so in theory it should be easier to manipulate, but in my experience, I found it much less convenient and much harder to use than the VRM Posing Desktop software mentioned above.
But beyond that, you're on your own there.
There might be other software out there to animate VRM characters, and so long as you can return to blender and apply the animation onto the VRM model there, it should work in Bakin. If you're ready, head on to Part V of this tutorial.
V - Adding the animations to Bakin.
If you paid attention to your file system, you'll notice that importing a VRM model in Bakin creates three additional files, with a different armature structure and bone names. We will use these automatically with the usage of the VRoid for Bakin addon to get our animations working properly in Bakin.
Blender Procedure
Open the blend file you've created that houses the VRM character with the animation loaded in the timeline. Before continuing, make sure you can edit the motion and that it isn't in an NLA strip that isn't currently being edited (if that's the case, right-click the strip and begin editing).
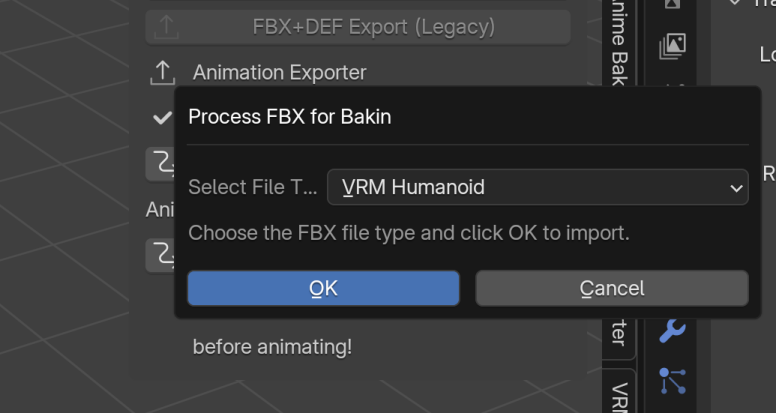
If you configured the file paths and directories correctly (read tutorial for more info), and your files are correctly placed, click on Import Bakin Retarget Model. This will open a prompt on the type of model to import. Keep it set to VRM Humanoid and press OK, and it'll import into the scene the model that Bakin generated, to which we will use for the retargeting process.
Important: If you imported your VRM prior to Bakin 1.13, you'll need to use the Legacy option. The procedure for both legacy and the new model remain the same.
You'll then need to open the Retargeting addon. Normally the addon should keep the selection on your VRM model, but make sure you're selecting the VRM (not the greyscale duplicate) armature, and then fill in the armature to copy the pose from as the _base_ armature.
In the Bone Pairings, press A in the 3D space to select all bones, then press the Guess button in the addon twice, and confirm.
Next, confirm the rest pose twice, and then bake the animation.
Return to the VRoid for Bakin addon, and define an animation name in the text field (minus the model name), and then click on Export _base_ animation.
Before exiting Blender, DO NOT SAVE THE CURRENT SCENE. You can always reproduce the steps to make this animation from the saved animation you did before using the addon's retarget options.
Manual Procedure (in case the add-on fails to export correctly for some reason): Instead of pressing the "Export _base_ animation", you'll need to do a few manual steps instead.
- 1. Select the original model armature (with the texture), and delete, then delete all the meshes associated to it.
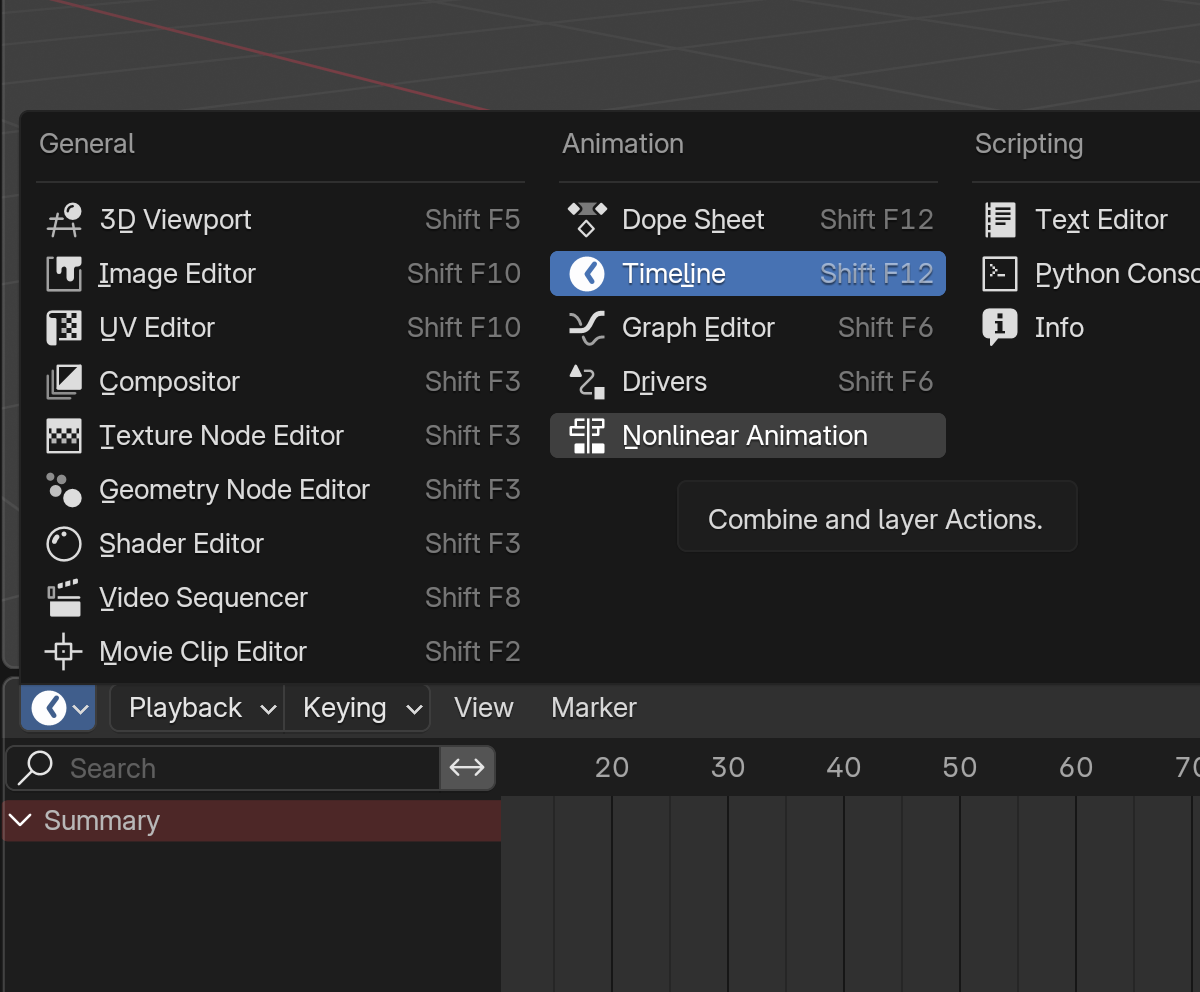
- 2. Swap from the Timeline to the Nonlinear Animation.
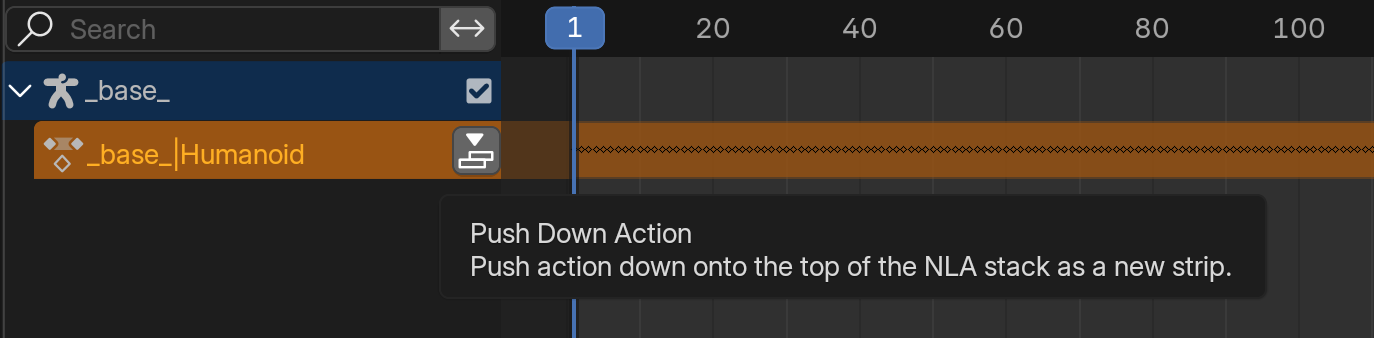
- 3. Press Push Down Action.
- 4. Change the Extrapolation setting from Hold to Nothing. This prevents a bug in Bakin where the root of the animation corrupts other animations and strange hips positions when it's not at the default position.
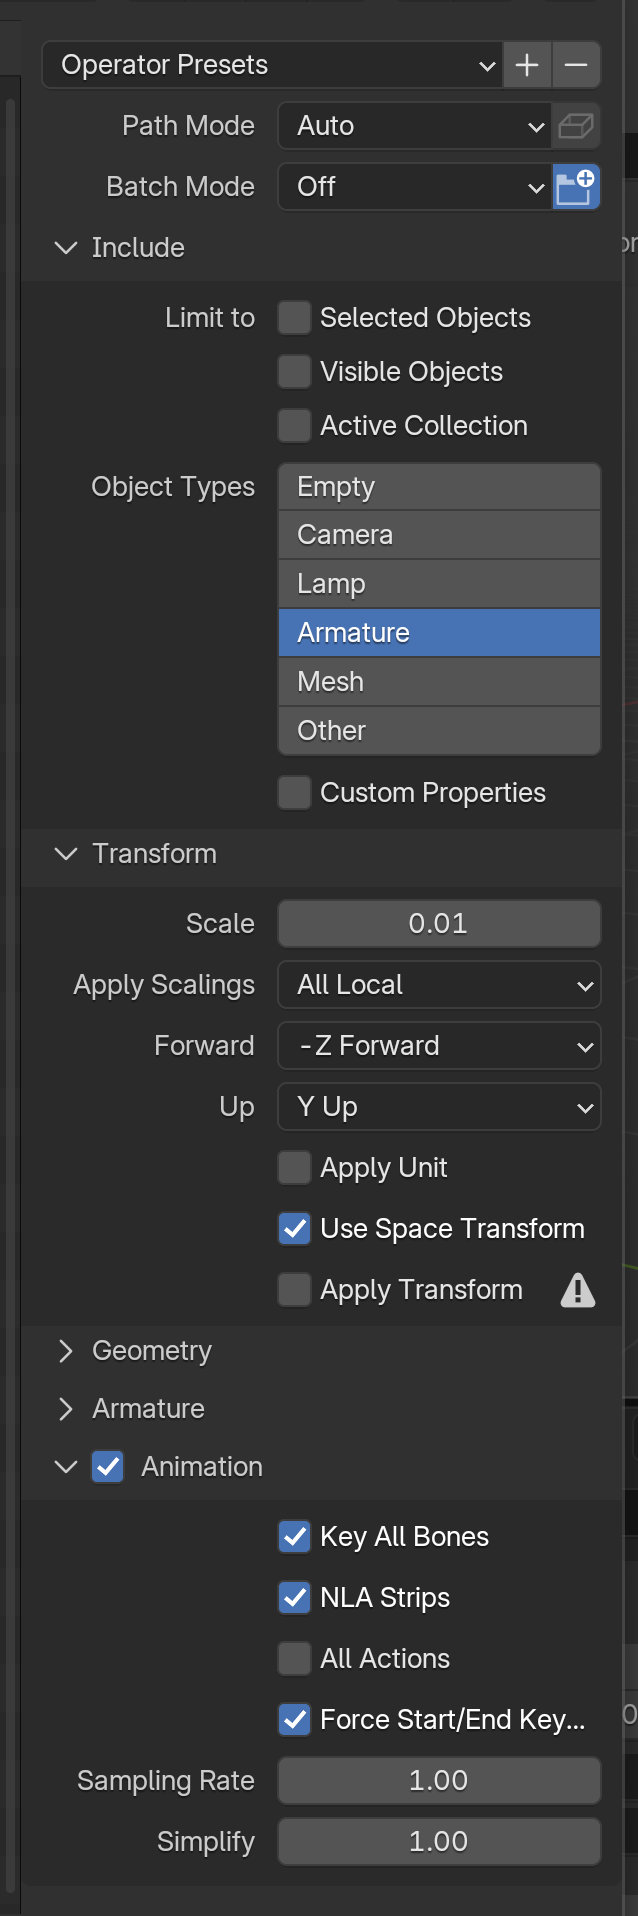
- 5. File -> Export -> FBX, and change the export settings to be as above. Update: Apply Unit needs to be turned off for the animation to work!

Bakin Procedure
Return to Bakin, go to the Motions object and find the one that your model uses. Click on the add button on the animation list, and add the file from Local Files. It should start playing! Make sure to rename the animation to something usable by either bakin's automatic systems or for yourself, and to tick the loop animation switch near it, and it should be usable in game!
If nothing seems to move, you might have Internal Format (Beta) turned on. Go to the resources of models, view the model of the “animation”, and then come back to animations, so that it turns it into an internal format, and it should work again.
IV - Tips & Tricks
Below are some additional things to note, take it or leave it.
Enabling real hair physics in Bakin
If you have a character with long hair walk, you'll notice that the hair is stuck onto your character's back. To fix this, go to Resources -> Models (not 3D Stamps), and find your VRM model (the hierarchy is different here compared to your 3D Stamps).
You'll need to unintuitively enable the option of "Movement Limit of Swinging Objects", and then set a value between 0 to 100... but the usable values are between 0 and 1. I find 0,4 or 0,5 to be a good, sweet spot. Not sure why the gravity feels so floaty however...
You're done!
If you liked this tutorial, you can follow me and my work through my Youtube Channel or my X account.
Development log
- Steam Community Version + Chapter 6 AdditionsJun 29, 2025
- VRMA Animations Export: procedure explained and fixed!Feb 17, 2025
Comments
Log in with itch.io to leave a comment.
Hello, it seems that after blender's last update this plugin doesn't recognize the retargeting plugin. Before the update I did use the plugin to import animations
I pushed a fixed version, 6.2.1, that shows the button regardless of the addon install status. Hopefully that should fix it, make sure to uninstall and then reinstall the plugin. Thanks for reporting the bug!
Thank you! It works perfectly now.
Python: Traceback (most recent call last):
File "<frozen os>", line 225, in makedirs
OSError: [WinError 123] The filename, directory name, or volume label syntax is incorrect: 'C:\\Users\\Fusil\\OneDrive\\Documents\\vroid\\avatars\\Uxera\\Uxera\t(BakinVRM)'
Yeah, I'm still getting the same error message.
...that's honestly weird, I tried with invalid characters and it somehow works. I'm a bit blind on your config so try the following:
It worked! I had to change the name, like you said. I appreciate your help.
What do I do if I receive an error such as this?
Python: Traceback (most recent call last):
File "<frozen os>", line 225, in makedirs
OSError: [WinError 123] The filename, directory name, or volume label syntax is incorrect: 'C:\\Users\\Fusil\\OneDrive\\Documents\\vroid\\avatars\\Uxera\\Uxera\t(BakinVRM)'
Seems like the character name might have an invalid character in its name.
I've pushed an updated version of the addon that should hopefully sanitize the name from invalid characters. If it doesn't work again, tell me.
VRoid for RPG Developer BAKIN (Blender Addon) by Meringue Rouge